Showing posts with label McDowell. Show all posts

Sunday, 16 August 2026

Reworked Order of Battle for Union Forces First Mannassas

Above :Union Infantryman (US public domain image) 

I have completed the Fire and Fury OOB for the confederates using the more detailed stand numbers, artillery types, infantry weapons and different morale system. I am using the percentages for the pick up games charts to determine this "chrome" within the OOB. Time to run my attention to the union.  

I have already determined a date for the battle in the first week of August and opted for D6 + 1. A throw of "4" results in a date of 5 August 1861. A little over 2 weeks from the real event on 21 July 1861. I have already determined with a dice roll that the battle will commence with a Union attack somewhere at 11 am. 

So the union counter Order of Battle begins with the commander  McDowell *** 2-0 who sits on top of  the First  Corps HQ counter. As a *** Corps general McDowell  can command up to 3 divisions using the HQ together with 1 further division all in the same or an adjacent hex (only when using the HQ).  In this case he is stacked directly however with I9, I6, I6, I6. So three fairly average sized divisions of 6,000 men and one oversized division of 9,000 men. The I6 divisions will each have two batteries of artillery and the I9 can have 3 batteries. McDowell will also have a Corps artillery reserve of two batteries. McDowell will not be an exceptional Corps commander. As the Union have a further 17 commanders 10 % of which should be exceptional I will allow them 2 exceptional commanders - one divisional and one brigade commander. I will identify them randomly. 

I have allowed each divisional counter on either side a divisional commander for tabletop purposes only which we can name for now and which will operate under Fire and Fury Rules.

All of the Union troops present will be  Green. The only veteran original counter in the East for the Federals is the I3 for the US regulars in Washington (which might be modelled as 2 x 3-5 on the tabletop. Looking at the actual Order of battle for the Union at Bull Run there were in fact 5 divisions. One had no brigade structures so was a collection of volunteer regiments or battalions as it were and the four organised divisions (First, Second, Third and Fifth Divisions) had 4, 2, 3 and 2 brigades (respectively). I am going to model each I6 counter as 3 brigades. The I9 brigade will have 4 brigades. That gives me 13 units to the confederates 15 (14 infantry brigades in 5 divisions and one cavalry regiment). I think the United States Federal artillery regiments should be experienced. Union artillery was in the main superior to confederate artillery throughout the war and certainly in equipment. 

IHeintzelmen is currently in the West chasing Price across Missouri so if we used the 4 remaining historical Divisional commanders from Bull Run these will be Tyler, Hunter, Runyon and Miles.  I will fill out some colour and background for each of these divisional commanders as I assemble them the stands for the tabletop. Some familiar household names will appear as Brigade Commanders the war commences.

Union Army of Northeastern Virginia (effectively a Corps organisation under the rules) 

McDowell - *** Corps Commander 

Artillery Reserve (Maj.  William Barry) 1st United States Artillery Battery 1 (HR) Exp Battery 2 (LR) Exp

First Division - Brigadier General Tyler  (I9 - Tyler)

First Brigade (Col. Erasmus Keyes) 1st, 2nd 3rd Connecticut & 2nd Maine (12/9/6) (MM) Grn

Second Brigade (BG Robert Schenck 2nd NY Militia, 1st and 2nd Ohio (9/7/5) (RM) Grn

Third Brigade (Col William T Sherman) 13, 69, 79 NY and 2nd Wisconsin (13/10/7) (RM) Grn

Fourth Brigade (Col Israel Richardson) 1st Mass, 2nd & 3rd Michigan, 12th NY (11/9/6) (RM) Grn   

Divisional Artillery Brigade (Col Romeyn Ayres) 3rd United States Artillery Battery 1 (LR) Exp Battery 2 (LR) Exp  Battery 3 Exp (RS)

Second Division - Colonel David Hunter  (I6)

First Brigade (Col. Andrew Porter) 8,14 and 27 (10/8/5) (RM) Grn 

Second Brigade (Col Hobart Ward) 1st 4th Michigan, 11th NY (MM) (9/7/5) Grn

Third Brigade  (Col William B Franklin) 5th, 11th Massachusetts, 1st Minnesota and 4th Pennsylvania (11/9/6) (MM) Grn

Brookwards NY Artillery Brigade (Col Brookward) Battery 1 (SB) Grn Battery 2 (RS) Grn

Third Division - BG Theodore Runyan E (exceptional) (I6)

First Brigade (Col Orlando Wilcox) 1st, 2nd 3rd New Jersey & 41st NY ((10/8/5) (MM) Grn 

Second Brigade (Col Ambrose Burnside) 2nd New Hampshire, 1 and 2 Rhode Island (9/7/5) (RM) Grn 

Third Brigade (Col Oliver Howard) 3rd, 4th, 5th Maine & 2nd Vermont (RM) (11/9/6) Grn 

Rhode Island Artillery (Col William Reynolds) Battery 1 (NP) Grn Battery 2 (NP )

Fourth Division - Colonel Dixon Miles  (I6)

Above : Colonel Dixon Miles at Harper's Ferry  (see attribution at site footer

First Brigade (Col Louis Blenker) E (exceptional) 8, 29, 39 NY 27th Pennsylvania (9/7/5) (MM) Grn

Second Brigade (Col Thomas Davies) 16, 18,  71 NY  (11/9/6) (RM) Grn 

Third Brigade (Col Calvin Pratt) 31, 32, 38 th NY (10/8/5) Grn (SB)

Divisional Artillery Brigade (Col Charles Griffin) 5th United States Artillery Battery 1 Exp (NP) Battery 2 Exp (LR) 

My next post will be on the creation of the  tabletop for Mannassas which I am going to have to resize to Fire and Fury from my original plans. 

See you in hell Billy Yank ! See you in Hell Johnny Reb ! 


Tuesday, 7 November 2023

Week 3 July 1861 - McLennan Moves West


"Up Alabamians !" General Bee at Bull Run 21st July 1861 (see site footer) 

Towards the end of the second week of July McDowell has led 27,000 men across the Potomac from the capital Washington to meet the massing confederates in the field. Jo Johnston has slipped away from Winchester with two divisions totalling 8,000 men to join the 19,000 men and 1,000 cavalry of General Pierre Gustave Toutant-Beauregard. If McDowell can seize some initiative he will be able to bring the confederate main army in Virginia to battle with the hope of destroying it and marching on to Richmond to sieze (or siege) the rebel capital and end the war. This was the plan. One decisive battle and an end to the war ! There are of course victory points to be won for large battles. 

Initiative Chit Draw

The confederates elect to take the number "2" chit - their safe option so the possibilities for the Union are "0", "1" or "3 guaranteed moves. I pass a small cup to my wife while she is watching telly - she is clearly a  Lincoln loving South hating Republican as the Union draws the "3" chit.  This should make things very interesting for the ensuing turn. McDowell will still need to roll a 2 or less to be able to start a set piece battle. The Union will move first however and has 3 guaranteed moves. 

It's good to remember that in order to be "on the right track" politically the Union needs to take a fair few strategic Southern cities by September 1862. It can never be all about Richmond although clearly taking Richmond would have a dramatic impact on the South politically. The chances of Foreign intervention would all but disappear and the confederacy would lose valuable resources each time turn. I have conducted a detailed review of the Victory point system and strategic priorities for each side at my post here which is alway posted at the top of my home page. 

I love to sit at the Northern end of the table and look "upside down" at the map from the North down. If we assume that the Union for now does not want to provoke Kentucky to join the confederacy by violating its neutrality then the corridors of advance become quite obvious. There is always the possibility for the Union to pick up victory points and then to apply for Kentucky to come out for the Union. While it is a logistical headache the more time I spend "upside down" the more I notice the advantages that the Union has with its almost "reverse" interior lines. The Ohio River allows the Union to shift troops rapidly by water from the East right across to the top funnels of the Cumberland River which heads down to Nashville and to the Mississipi to threaten Memphis. Littered about the map the Union has significant resources that once collected under a leader could prove to be an absolute headache for the Confederates. 

There is also something to be said for ensuring that all departments have infantry divisions ready for the next augmentation opportunity. 

In summary then initially in terms of big "ideas" for the Union there is the assault on Richmond. The Union has commenced the war in Virginia by crossing the Potomac. Out West there is key strategic goal of clearing the Mississipi and taking the major cities along it. This would in turn open up Tennessee with cities such as Nashville. Finally there is always the option of stretching the Confederates thin with a coastal assault against the interior of the confederacy. The coast of Georgia or the Carolinas could be the stage for sea bourne landings. Further and while the Confederates would have good notice of any attempt there is nothing to prevent the Union making a landing in the Gulf to try and seize the major city of New Orleans. That would be a blow to the confederates and open up the Mississsipi corridor from the Southern end. 

Union Moves (3 Guaranteed Initiatives)

The Union undertakes some building and consolidation in the West with the guaranteed initiatiations. 

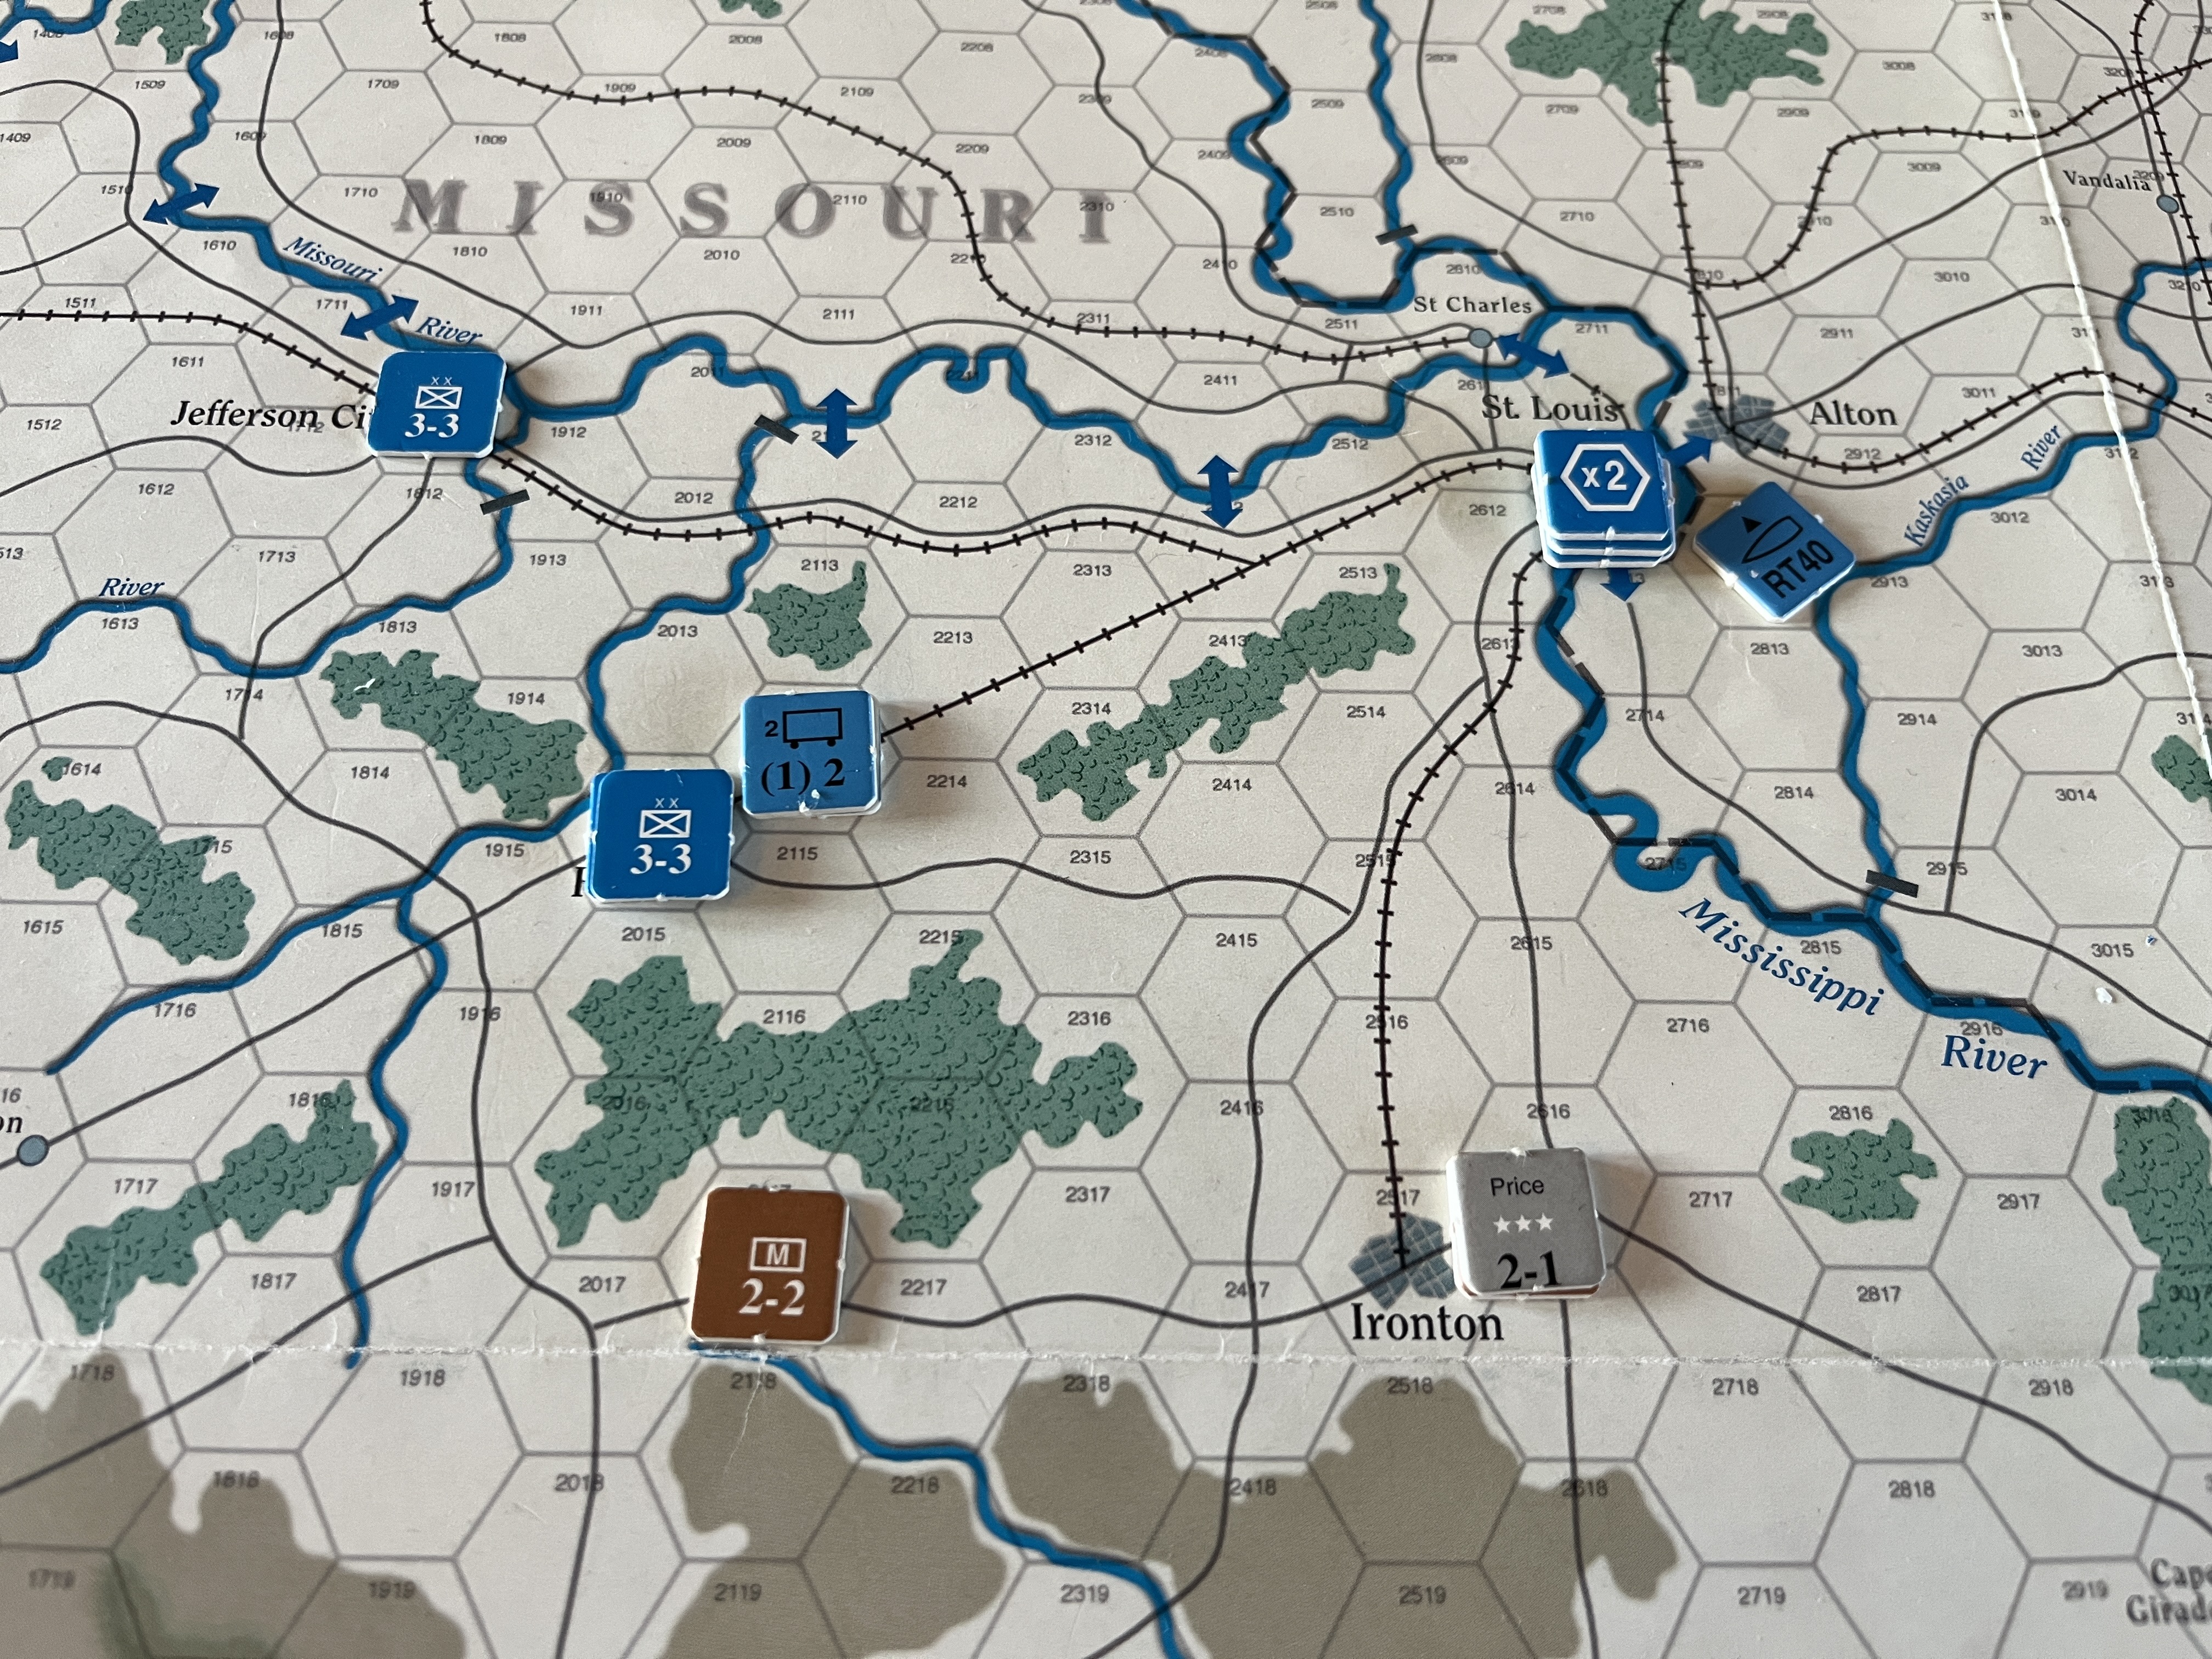
(1) The Unions 3-3 infantry division on Jefferson City moves to join Heintzlemans command at Rolla and sloughs off a 2-3 brigade. The  I1 brigade will be able to merge with the I3 counter and Heintzleman will be able to command the resulting I4 and I2 brigades from August. Equally he could just command the current I3 and I2 counters in turn 4 of July to pursue Price. 

(2) The River Transport unit at Cincinatti transports McLennan, the supply train with 4 supply points and an M2 counter to Evansville which is just about manageable in terms of the "40" point for the River Transport. 

(3) The river transport unit at St Louis transports the M4 counter to Cairo in Illinois. 

Finally, the Union tries to initiate combat using McDowel's command against the Confederate Army at Mannassas Junction but is unsuccessful. 

Confederate Moves (2 Guaranteed Initiatives)

(1) The Weightman's State Missouri Guard brigade (M2) unit trailing Price and Cawthorn's State Guard Cavalry cavalry unit from the defeat at Rolla movs to reunite at Irontown. 

(2) An I3 South Carolingian brigade from Fort Sumter crosses the swamp entrains and then travels by rail to Stevenson B4704 (Heading for Nashville)

Looking at the list of Union target cities it is clear that the South needs to secure Tennessee in particular. 

The strategic position in the West is beginning to look interesting.


The fact of the matter is that unless the Union rolls a "2" for combat initiative it cannot launch the assault at Mannassas Junction. That must occur at some point ! In the meantime my divided brain can continue the build up in the West. 


Monday, 6 November 2023

Week 2 July 1861 - McDowell Crosses the Potomac


"Colonel there is no use dodging. When you hear them they have passed"  

Joseph E. Johnson to a flinching Colonel on the Peninsula before he was hit himself. (see site footer)

Northern newspapers are trumpeting the victory in Missouri and there are outpourings of celebration but also national grief in respect of the fallen hero Lyons. Lyons is the first General Officer to die in the war (again and thanks to my stupidity in attaching him to a confederate brigade in the thick off it - history repeats itself and the Union loses its highest initiative commander).  News also reaches Richmond of the set back at Rolla. Jefferson Davis is under pressure from the public and there are calls to eject the Yankee invader from Virginia. The Confederates can wait for the Union to make a move. The historical reality at this point is that both hoped thought that one decisive battle in the East would settle the matter. I could be cautious for the Union however tying down large amounts of troops to protect Richmond is an end in itself. 

Joseph E Johnston is technically the senior officer in the field on the confederate side. I am not sure of the extent to which he and P.T.E Beauregard would have cooperated daily but we know historically how they managed to mass their troops at Mannasses junction to defeat the first union thrust at Bull Run. 

In essence the strategic position on the map overall is largely unchanged apart from the set-back for the confederacy in Missouri. I discussed the overall strategic position in my post for the first turn here . It's almost 3 months since I wrote this piece so I have had to remind myself of my initial conclusions. 

The CSA elects to take a guaranteed "2" as their initiative chit drawer. The options then for the Union are 0,1 or 3. I let my wife draw the chit to avoid any bias karma infiltrating the cardboard and a "1" arrives. The union will finally be able to perform some guaranteed movement but after the Confederate turn. 

Confederate Moves 

(1) Price uses a Confederate initiative and orders the M2 and C1 counters (The surviving elements of Weightman and Cawthorn's brigades of the  Missouri State Guard) with him to move. The Cawthorn's cavalry counter moves as far as Ironton A2517. Weightmans Missouri State Guard brigade (M2) marches as far as A2117. Ironton is in supply (being 3 infantry move points from the Mississippi). It also continues to threaten St. Louis as the Missouri railroads can be used by either side while Missouri remains neutral. Although Price's force is possibly no longer a real threat but could be reinforced by Polk in the South. 


(2) As a backfill to logistics (I forgot to consider combat supply in the first turn I am going to allow the confederates to broadcast 6 points to a new depot at Manassas Junction. An I2 counter will be lost to make the depot. 

(3) For the second initiative move the supply train at Manassas Junction is going to ship 4 supply points to Winchester.  I think the stack at Winchester C2108  requires access to combat points in case it is attacked or wants to attack 

Jo Johnston is able to roll a move initiative - 3 or less on a D6. 

(4) One of the I5 divisions sloughs off an I2 brigade which will remain at Winchester and Jo Johnston and an I5 and I3 march to reinforce Beauregard at Manassas junction. If McDowel decides to attack he will be facing a much more even fight now that 8,000 troops have joined Beauregard at Mannassas junction 

Those are all the confederate moves.

Union Moves

McDowell in command of the first corps HQ can move 3 divisions within the corps and an additional unit or division as a *** leader. He crosses the Potomac with the I9, I6 I6, I6 counters. I think it could be wise to concentrate additional forces before an attack. There is an I5 division next door in Alexandria and a further I3 veteran division in Washington. It may be worthwhile switching in Mclennon  prior to attack but then again McLennan has an initiative of 1 so he may not be able to attack in any event ? The command and control in War Between the States is somewhat frustrating but I quite accurately. In early 1862 for example Lincoln was unable to get McLennan to attack for many months and then again on the Peninsula he was continually plagued by over-caution and over-estimation of the force opposing him. Lincoln was continually frustrated that having built an army McLennan was not particularly disposed to use it. 

McDowell has an initiative of "2" so on a D6 he should be able to give combat on average at least once every 3 months.  Any battle at the moment would be a broadly equal one. 

From a personal point of view it will commit me to a good 1-2 month's painting as I think I will need about 50-60 more small 20 mm square bases each of Union and Confederate infantry (4 x 10 mm figures to a base and 4-6 making up a 3 inch square volley and bayonet brigade bases. As the war progresses the figure requirement is only going to increase. By 1862 both sides could have as many as 80,000-100,000 men in the biggest field armies in the East and West. An 80,000 strong force will need around 40 x 3 " stands on each side which is 240 bases or close to 1,000 figures a side. There is no getting around it. I think the table sizes will also increase to about 9-12 feet x 4-6 feet for some of the battles with a corresponding requirement for scenery. This is the whole point. If I can get to that point then essentially with whatever rules I ever use I will be able to field two decent size armies. I will be set up for good. 

The Bull Run size battle will be a good half way point to reach for with my modelling. 

Despite my immediate concern over the painting logistics I think the pressure from Lincoln would be too much and for historical accuracy I roll for an attack. McDowell fails for this turn but already the conveyor belt for infantry stands is back in motion. 


Heintzleman who is currently at Evansville in Illinois manages to activate (roll of 1 on an initiative 2). A leader can travel normally by rail without having to use a rail point. He moves to Rolla to take command of  the Trans-Mississippi theatre. 

That ends the Union movements and the weekly turn. I will update the living tracker. If the Union can make a combat initiative roll next turn they can attack ! 


Reworked Order of Battle for Union Forces First Mannassas

Above :Union Infantryman (US public domain image)  I have completed the Fire and Fury OOB for the confederates using the more detailed stand...