Thursday, 24 August 2023

War Strategy 1861 - Scott's Annaconda Plan and the Victory and Political System for the Campaign


Above : Winfield Scott's Anaconda Plan 

Before I dive into the minutiae of the July 1861 strategic turn for my campaign (essentially supply and recruitment) I thought it might be useful to pause and appreciate the historical planning and deliberations on both sides and how this will relate to the rules the campaign taken from the boardgame War Between the States. I have written before about how the Union has to take the battle to the confederacy in order to satisfy its war aim of bringing an end secession through coercion and manage public opinion and outside politcial pressure. Initially it is clear that on the Union side the plan was simply to advance on to Richmond after defeating the confederacy's  main field army in one large engagement. We could call this simple strategy "On to Richmond" ! 

Given the small number of troops in the field and the overwhelming size of the confederate States and disparate nature of political leadership (the cotton states were not entirely wedded to the idea of a Central government and ceding all of their resources to Richmond) this was always was a somewhat naive plan In any event the result of First Manassas or Bull Run on 21 July 1861 soon disavowed the leadership on both sides that this was going to be a short war. The Confederate States provide a theatre of operations larger than Western Europe. In July 1861 the Unions attempt to invade Virginia and force a resolution of the war with 35,000 men was naive. Tecumseh Sherman who was to play such a key role as Grant's trusted lieutenant later in the war privately ridiculed the notion of a call up of 75,000 volunteers for 3 months by stating that "you may as well try and put out the  flames of a burning house with a squirt gun. By the Autumn he was personally bombarding Washington with requests for 200,000 men to deal with fighting in Kentucky alone. He was declared unfit for duty and temporarily removed from his command on the grounds of sanity. He was of course proved a prophet in terms of the utter scale of what was required on the part of the union to bring about a total victory. Eventually and throughout the course of the something in the order of  2 million troops took up arms for the Union and 800,000 for the confederacy.   At the outset of the war the numbers in the field were roughly equal which belies the notion of the "Myth of the lost cause". For the union to achieve and early victory and avoid huge battlefield casualties over 5 years it would need to rapidly take fortified cities in the South which generally requires a battlefield advantage of 3 to 1. At the peak of 1863 the Union only ever had an advantage of 2 to 1 to conduct an offensive to take the a piece of ground the size of Western Europe. 

The reality remained that all the South really had to do to "defeat" the unions strategy was to essentially hang on and fight a defensive campaign. There was a good chance that the North would grow weary of the war and sue for peace once its cost in blood and treasure was fully appreciated by the Union public. 

The Union however did settle on a strategic plan to crush the Confederacy at birth thanks to its its first Generalissimo, and hero of the Mexican War Winfield Scott and it was good one. I have not seen anyone articulate an alternative plan that would have produced a quicker result. The so called Annaconda plan had three elements. Firstly to blockade and occupy where possible the Confederate coastline to prevent the  export of trade goods and the import of war materials such as the rifled musket. Secondly to cut the Confederate States in two with a thrust down the Mississipi from St Louis to the coast. Such a thrust would cut off states such as Arkansas and Texas from the union and again hinder the import of war materials through the Southern Gulf coast. Finally to surround and constrict or apply pressure to the Confederacy including its capital Richmond through the use of the Union's overwhelming manpower in the form of field armies. Whoever created the contemporary print above failed to appreciate the real detail of the plan. There was no real ring of union armies out somewhere West in the Indian territory. The head of the "Great Snake" should be menacing the upper reached of the Mississippi South of St Louis close to the beginning of the war. Geography in a way neatly defines the Union strategy and initially at first it is one that I will aim to follow when wearing my Union forage cap. 

It is worth reviewing how the game itself "War Between the States" deals with Victory as obviously this will further dictate how I set about matter when playing the Union. I am going to use the "Experimental Political Rules" from the 2006 rule book along with all or any amendments in those living rules on the Decision Games website. The system in essence "appreciates" the Unions conundrum and the potential for war weariness bringing early closure to the war. A loss of momentum in the war can very much lead to the loss of the border states, foreign intervention on the part of Britain and France (economic) and potentially an outright  confederate victory. I am really pleased with the way the strategic and political considerations of the war are modelled and how this will direct my thinking for both sides from the map to the tabletop. 

The first way for the Union to win is through a "Historical Victory". If the Union holds each of Nashville, Memphis, New Orleans, Atlanta and Richmond prior to the end of the 200th movement turn in April 1865 (the surrender of Lee at Appomattox Court House) then the Union wins. If not then the Confederates achieve their independence in part or full I guess. This then present some clear war aims for both sides. We do not have to wait until April 1865 or the capture of 5 key cities to resolve issues. There is a variant that tests the position at 11/64 on the Northern Election. If the Union holds four of the five cities the game ends in Union victory and if less than two the Confederates succeed as presumably Lincoln is thrown out of office for a "peace party" or candidate. I am not yet sure if I will adopt that variant given the way in which the main cities are in play in the "experimental poltical rules" (see below). There is nothing to prevent though the variant historical victory rules being played with experimental political point rules. It all adds complexity and at the end of the day the Union has to set about taking those key Confederate cities out of its supply chain. 

The second victory track using the "Political Point" system is far more nuanced. Both sides accumulate points based on war achievements and conditions. The difference between those two scores produces a number which can be rolled against using a D6 on a chart for each of 1861/2, 1863 and 1864/5 by either side making a political appeal. This of itself costs increasing political points for repeated appeals. To give an example in 1861/2 if the Confederates have just 3 political points in their favour or more then the table reads as follows :-

1 F, 2 F, 3 F, 4 Mc, 5 Kc, 6 C

Where F is Foreign intention, Mc is Missouri joining the confederacy, Kc is Kentucky joining the confederacy and C is an outright confederate victory. I will deal in full with the issue of Kentucky and Missouri neutrality and the potential for each to join the Union or the Confederacy in the early stages of the war in a separate post. 

Foreign intervention is a real possibility on the tables if the Confederacy is doing well during 1861/2 with only a slim chance in 1863 if the Confederacy is doing really well. The confederacy will then be recognised by both Britain and France, all import supply points through unblocked ports are doubled and the games ends in 2 years (26 cycles of a strategic turn and four movement turns). This is a fantastic mechanic. If the Confederacy can achieve recognition through some early gains in 1861/2 it can boost its resources and cut short the war. I expect this represents the Great Powers bringing the Union to the table to negotiate a peace out of their own economic interests. The reality was of course that after Antietam and the Emancipation Declaration there was little prospect of a Britain in particular coming to the aid of the Confederacy. Queen Victoria had wept on reading Uncle Tom's Cabin and Britain had been waging a war on the High Seas against the slave trade since 1821. This is again modelled with the Emancipation Proclamation being an option for the Union. The Confederacy gains 5 political points but any  possibility of foreign intervention is prohibited. 

Only a score of + 3 or more in the confederates favour can produce the small chance of an outright  confederate victory in 1861/2. As the war continues the potential results for the Confederacy both improve and the political points difference required to achieve those results. As an example if the confederates are on "0" in 1864 an appeal to the political tables will give them a victory win a roll of 3-6 on a D6. There are a multitude of results in between on a complex matrix. 

At the other end of the scale as the Union racks up larger political points scores it can bring Kentucky or Missouri into the Union or of course achieve an outright Union victory. In 1861/62 with a score of 16 + points the Union end of the table reads as follows :-

1 U, 2 U, 3 Ku, 4 Ku, 5 Mu, 6 Mu 

The Detail then of how each side can score political points in order to seek to gain political advantage or to bring an early end to the War should drive the strategy of both sides. Rather than write reems I will just set it out. As the campaign progresses I will include an updated political point tracker with the unit counter/Volley and Bayonet bases tracker that I have already created. 

Victory Appeals 

Each player can make one free appeal at any stage to the political matrix charts to attempt to secure a victory. A secondary result of foreign intervention or securing Kentucky or Missouri all qualify as failed appeals for the purposes of the points system. Subsequent appeals on the matrix cost points in increasing amounts such that by the fifth attempt the points cost is 16 points.  From the union point of view then there is an art in timing those appeals after a degree of traction has been achieved with other war wins.

Union Political Points 

The amended rules very much expanded the territorial ambitions of the Union beyond the 5 key cities some of which are worth 2-10 points. The other target cities worth a point are Charleston SC, Chattanooga, Corinth MS, Knoxville, Mobile and Vicksburg. A point is also award for the first capture of a confederate fort. A further two points are awarded for taking a basket of smaller cities on the Trans-Mississipi which makes that small theatre of some relevance (so perhaps my criticism of the orientation of the Snake is uncalled for !). There is a point up for grabs for occupying and destroying lead and salt mines in South West Virginia and also for cutting the strategic rail line which runs from Lynchburg Virginia to Cleveland Tennessee. There is also a point available each and every strategic turn that the Mississipi is free of Confederate ironclads, fortifications and river flotillas and every city on the Mississippi is in Union hands i.e complete control of the Mississipi will start a ticking points clock. 

There are battlefield points available for eliminating Corps and Army Headquarters counters (ceases in 1865), causing a Union headquarters force to retreat via combat with 20 per cent or greater casualties and for every 75 counter strength points eliminated by any method (I presume this would include supply attrition as well such that an Army forced away from supply or besieged would be a result for the Union). 

The Union player receives points for the capture and parole of Confederate leaders, for failed Confederate political appeals and also for subsequent Confederate drafts or conscription. 

I love the nuance and detail in this political point system. It should drive the battlefield and political strategy of the Union in a way which makes sense of the geographical and historical context. The tug of relative fortunes is further enhanced by the Confederate political points system. 

Confederate Political Points 

The amended political points systems for the confederacy are genius and display an in depth understanding of the war on the part of the rules writers of War Between the States. 

There are huge points up for grabs for a Confederate capture of Washington (50 !) and ten each for Baltimore, Cincinnati or St. Louis. Further there is a point up for grabs for the capture of a union fort (Fort Pickens then looks like a welcoming target in the South) and for each strategic turn that any one or more of the four target Union Cities are unable to trace a rail route back to the Northern edge of the map. This creates the possibility for aggressive action on the part of the confederacy. Raids in force into Maryland or Ohio or limited cavalry actions. A result from an invasion of the North such as the Gettysburg campaign to chip a few points back prior to an appeal to the political matrix. 

There are similar rules for battlefield victory points, five points from the Emancipation Proclamation,  points from the parole of captured leaders, for  failed victory appeals and from Union drafts and conscription. The rules around drafts and conscription model war weariness very effectively. 

The icing on the cake for me are the points up for grabs if the Union does not pursue an aggressive invasion of the South. These operate almost like a pendulum the intrinsic balance of which is loading against the union as the war progresses. In some ways then the union is on a timetable of conquest and the confederacy if it wishes to bring the war to a close cannot endlessly trade space for time in the hop of hanging on until April 1865. The various points to set our war progress fulcrum or timetable are as follows :-

  • Beginning 1/62 if the confederates occupy  and connect by road or rail any one or more Union Cities other than the four target cities they receive a political point each turn while that condition persists. In three short strategic turns then if the Union failed to oust the Confederates an Appeal to the political matrix could result (on a one in 6 chance) in a Confederate victory !
  • From 8/62 there is a political point each turn up for grabs if the Union has not captured at least four confederate political point cities East of the Mississippi; 
  • Similary from 10/63 for 7 political point cities East of the Mississippi; 
  • from 10/64 for 8 political point cities East of the Mississippi; and
  • if the Union player fails to capture the six trans-mississippi political point cities by 6/64 strategic turn the Confederate player gets the two points instead of the Union.
Mathematically I have not gamed out in my head the  interplay of all of these factors and points however the essence of the "timetable" system to my mind really does capture the sense that the Northern public were going to tire of the war if they could not see an end in sight. It is not a question of the sides simply tallying up points to see who "wins". The points present the opportunity to make a claim against the victory matrix (which in itself can cost points) in order to secure the political victory. 

The whole system models then party and public pressure or delight at strategic progress or battlefield results, foreign intervention and war weariness. I love this system as a whole and hopefully it should not produce a "crazy" or a-historical result or drive a-historical actions. It seems to both encourage the two sides to be doing the sorts of things they ought to have been doing or politically they needed to do and prevent either side from just "sitting" back and allowing the other side any measure of initiative. There his the potential for the tempo to shift for small strategic issues to play out in the "bigger picture" of the war.

If I need a reason to invade to invade Virginia I have one. If I need a reason to resist the invasion of Tennessee rigorously I have one. The Mississippi or Memphis and Vicksburg cannot be given up lightly by the confederacy. The North should be wary or raids in force into Union border States. 

The whole point of a war-games campaign is to tie the tactical horse of battlefield success to the strategic cart so that the two add meaning and richness to each other. The survival of armies in the field in the Western theatre will matter. The loss of a hex with a rail link or access to a waterway will matter for more than mere movement to the next battle. I am very excited about the way the political system in the board game could influence my thinking both for the creation of field armies, their composition and how I use them. If I ever needed a good reason to paint a couple of thousand miniatures I have one ! 

See you in hell Billy Yank ! See you in hell Johnny Reb ! 

Tuesday, 22 August 2023

Living Order of Battle and Game Tracker


Position at the End of Strategic Turn August  (8) 1861

This Page is a live summary of the position and type of all map units and other important information for both sides. It includes a summary of blockades, political points and developments, supply and personnel points and for each "on map" counter what they "contain" for the tabletop Volley and Bayonet brigade bases which will fight our battles. The Order of Battle is extended to include the factored in artillery. I have also listed all fortifications and how these will translate to the tabletop. 

Map Key 

A/B/C 1234 - Map number and coordinate for unit grouping on War Between the States map (A is the West Theatre North map - B is the West South map including the Gulf coast from North West Florida to Galveston in Texas. I will include names of places on the map - confederate cities which attract supply points will be in bold and names in italics will be confederate sea ports. Supply points provided by cities and ports vary by month e.g. by season/harvest time. New Orleans, Richmond, Nashville, Memphis and Atlanta are major supply cities and increase in supply provision annually. 

Counter Key

Counters in War Between the States are in strength points that represent c. 1,000 men. Volley and Bayonet units/bases have strength points for each 500 men. 

I# Infantry counter and strength, C# Cavalry counter and strength, M# Militia counter and strength G# Garrison counter and strength, HQ Corps HQ, FA# Field Army and Supply Name***(#-#-#) Leader with Star Rating and Statistics (Initiative, Combat Span (****/***** only), Combat Value for Morale), RT River Transport, RF River Flotilla RI Iron Clad NT Naval Transport NF Naval Flotilla, SG Siege Gun, X2 Fort, X3 Fortress, ST# Supply Train and Supply (up to 10 points) DepName# Department and supply e.g. DepMiddle, Depot#/# Depot counter number and Supply (up to 99 points) 

Volley and Bayonet Bases "contained" within the counters at each location are described and using standard notation some examples 6-4  PT/NE DG (a 6 point green infantry base with dedicated artillery with morale 4 operating at 40 % exhaustion within a unit - the no elites designation is lost when promoted but the PT poorly trained designation remains for six months following recruitment), 4-5 (a veteran  brigade stand with morale 5 operating at 50 % exhaustion within a unit, Cav 2-4 PT (a two point green cavalry brigade stand), 2-5 SB-F PT (smoothbore field piece (probably a 12 lb Napoleon) newly recruited) and so on. 

Artillery is assigned to beginning/new units in sensible types and amounts based on the standard V&B Corps and those listed in the House Divided campaign order of battle. That Order of battle details some variations in units from the outset so some regular US units in Western union formations and a stiffer brigade in the confederate Army of the Shenandoah. Each division of 6-9 counter points (12-18 base points) will be assigned initial artillery and forces with multiple divisions and an on map HQ function may also receive Corps artillery as per standard V&B ACW corps by year and upgrades and promotions will occur/can be awarded  quarterly 3 March/6 June/9 September/13 December in accordance with the House Divided campaign rules. 

Finally for tabletop command and control purposes only I may include on an ad hoc basis one or two divisional leaders as appropriate for forces approaching divisional strength or more (c. 6/7,000 men - 6 counter points - 12 base points) where a counter commander is not present but for basic game purposes only. 

Fortifications X2, X3 special cases for Richmond, Virginia and Vicksburg

The War Between the States campaign rules allow a free upgrade of any x2 counter built in Washington or Richmond to a x3 fortress. Rather than have a chance role for the placement of fort (this seems silly when both capitals were fortified from the get go as a strategic imperative)  from July 1861 and with an expenditure of 30 supply points (the average cost for fort placement) both sides can place a fort counter. Washington and Richmond will then commence fortifications/works and siege artillery which translate to the tabletop in accordance with the schedule in the House Divided campaign rules. By 13/61 the counters will be upgraded to fortress counters to designate the advanced state of the works and artillery. I will keep a running tally in the Order of Battle of the State of those fortifications. 

In addition the confederate side has designated Vicksburg as "fortress Mississippi" and at no additional cost it will follow the schedule of fortifications and siege artillery from 8/61 in the House Divided Campaign rules up until 9/61 and receive a x2 counter. On payment of 50 supply points from turn 10 in full or across a number of turns (a below average cost of a fortress purchase attempt) Vicksburg will upgrade to a fortress and will continue to follow the "fortress Mississippi" fortification and siege artillery schedule. 

Fort Monroe  C3118  begins with an X3 counter on the map and and begins the game with 48 " (6" per side of "fort" sections under the Volley and Bayonet rules and 2 brigades of 2-5 SG-SB artillery. As a fortress in the War Between the States Rules can take up to 100 strength points of counters I think the suggested 24 " (6 " per side) is a little small. Equally for a fort to take ten points of counters (perhaps 5 bases at 4 strength points and 2 brigades of siege artillery and it the counters divisional artillery) it will need probably 12 " on each side initially. 

All other existing or built forts X2 counters (e.g. Memphis, Charleston) will have or create 24 " of field works and 2 SG-SB Artillery in two instalments (i.e complete after a quarter). Any newly built X3 counter will have the works upgraded to "Fort" sections in two instalments (i.e complete after a quarter) with 2 additional SG-R artillery brigades. X2 and X3 counters other than those in the campaign set up and Washington, Richmond and Vicksburg will be subject to payment costs in the War Between the States rules but I may dispense with the  "chance" rolls for placement. I am not sure I like the chance roll ? Surely if a side expends the resources it should be able to complete the works. Throwing away say 200 supply points for the confederacy because a 1 in 6 die roll fails to construct a fortress doesn't seem fair. I will probably just allow a build on the payment of the above average chance cost payment (1-4 on D6) - 40 for a fort and then 120 for a fortress. That seems sufficiently expensive for the confederacy to "dig in". Sieges generally were lost in each instance 

Strategic Turn August 1861 

Politics and Blockades  for August 1861 Strategic Turn 

B4026 Pensacola and C3119 Norfolk are blockaded due to union occupation of B4027 Fort Pickens and C3118 Fort Monroe respectively.

 
Supply Points are now now noted with rail points at the end of the Orders of Battle.

Both sides exhausted all Personel Points for the Month (which are use it or lose it in any event). 

The Confederates gambles and Missouri joins the Confederacy. Both sides will receive additional Personal Points in accordance with a Schedule with roughly 2/3's of these going to the Confederacy. The Union gains a point for the failed victory attempt. 

Political Points/Victory Conditions/Neutrality etc. 

Confederate  0 - Union 1 

Two failed appeals by Confederates 7/61  & 8/61 (required 1 or 2 for Kentucky or Missouri  respectively to join the Confederacy and Missouri joined). 1 point to the Union for the second attempt on the table. 

(1) Kentucky Neutral

(2) Missouri Confederate

(3) No Foreign Intervention

(4) No Emancipation Proclamation

(5) Neither side Occupies any Cities (Variant Political Rules 29.11/29.12) or the union the Lead and Salt Mines (Saltville/C0819) 

(6) Union has not cleared Mississippi

(7) Union has not cut Virginia/Tennessee Rail Link

(8) No destroyed or captured Forts or destroyed Army HQ's 

(9) Union has destroyed 3 map strength points 

(9) No replacement of leaders for either side  of Leaders

(10) No additional Volunteer Calls or Drafts 

Confederate Order of Battle following Strategic Turn August (8) 1861  

Gulf Coast/Mississipi

B0153 Galveston M3 (6-4 PT NE) 

B2732 X2 (48 " field works and 2 x 2-5 SG-SB)

B2628 New Orleans G1, RT (2-4 PT NE)

B2408 M2 (4-4 PT NE - Alabama Volunteers) 

B3627 Fort Morgan, X2,  G1 (2-4 PT NE, 48 " field works and 2 x 2-5 SG-SB)

B4026 Pensacola (blockaded by Fort Pickens) M2 (4-4 PT NE) 

B2317 Vicksburg Fortifications Projects (see above begins 8/61)

Trans Mississipi

B1705 Little Rock, DepTransMi, ST5, M2 (PT0), G3 (PT(0)  (4-4 PT(0) NE, 6-4 PT(0) NE),

A2517 Ironton Price***2-1 continues to retreat from the lost battle of Rolla, C1, Cawthorn Cav 2-5 PT) M2 (Weightman 4-4 PT NE) 


Tennessee/Northern Alabama

B2802 Memphis,  DepKen/Tenn, X2, ST5, M2(PT0) G3 (PT(0), RT (4-4 PT(0) NE, 6-4 PT(0) NE 2-5 SB-H PT, 48 " Fieldworks 2 x 2-5 SG-SB) 

B4026 Nashville, M2 (4-4 PT NE Tennessee Brigade tbc) ,I3 (6-4 PT NE - James Trapier South Carolina Brigade 2nd South Carolina (Palemeto Regiment and 10th and 19th regiment). 

B3021 New Madrid, M2 (4-4 PT NE)

A 3222 Union City  Polk***2-1, I3, C2 (6-4 PT NE (or 2 x 3-4 PT NE tbc), 2 x Cav 2-5 PT, SB-H PT) 

Atlantic Coast/Carolinas 

C1145 Fort Pulaski, x2, G1 (2-4 PT NE, 48 " field works and 2 x 2-5 SG-SB)

C1641 Fort Sumter, x2, G1, I3,  (2-4 PT NE, 6-4 PT NE, 2-5 SB-F PT, 48 " field works and 2 x 2-5 SG-SB)

C1640 Charleston, DepSCarol/Ga/Fla, M2(PT0), G3(PT0)  2 supply points (4-4 PT(0) NE, 6-4 PT(0) NE) 

C3527 Fort Hatteras & Clerk (Not made), G1 (2-4 PT NE)

C2024 Raleigh, DepSVirginia/NCarol, M2(PT0) G3 (PT))  (4-4 PT(0) NE, 6-4 PT(0) NE) 

Virginia

C1612 2 x M2 (2 x 4-4 PT NE)

C2108 Winchester,  I2, ST4 (4-4 PT NE) 

C2409 Manassas Junction, Beauregard****3-3-1, Depot 6-6, 1stCorpsHQ, ST4, C1, I6, I7, I5 (Check Merger) Stuart  Cavalry 2-5,  2 x 4-4 PT NE , 2 x 6-4 PT NE , 5 x 4-4 PT NE , Corps Artillery 2-5 R-F , Divisional Artillery 2-5 SB-F PT, 2-5 SB-H PT and J.Johnston****3-3-1, I5, I5 (Stonewall), (Jackson "Stonewall" Brigade (50%)  6-5, 4-4 PT NE), 6-4 PT NE, 2-5 SH-H PT) (High morale 6-5 first stonewall brigade is allowed from House Divided campaign rules set up and now augmented to a mixed brigade ) 

C4119 Norfolk (Blockaded) M4 (2 x 4-4 PT NE) 

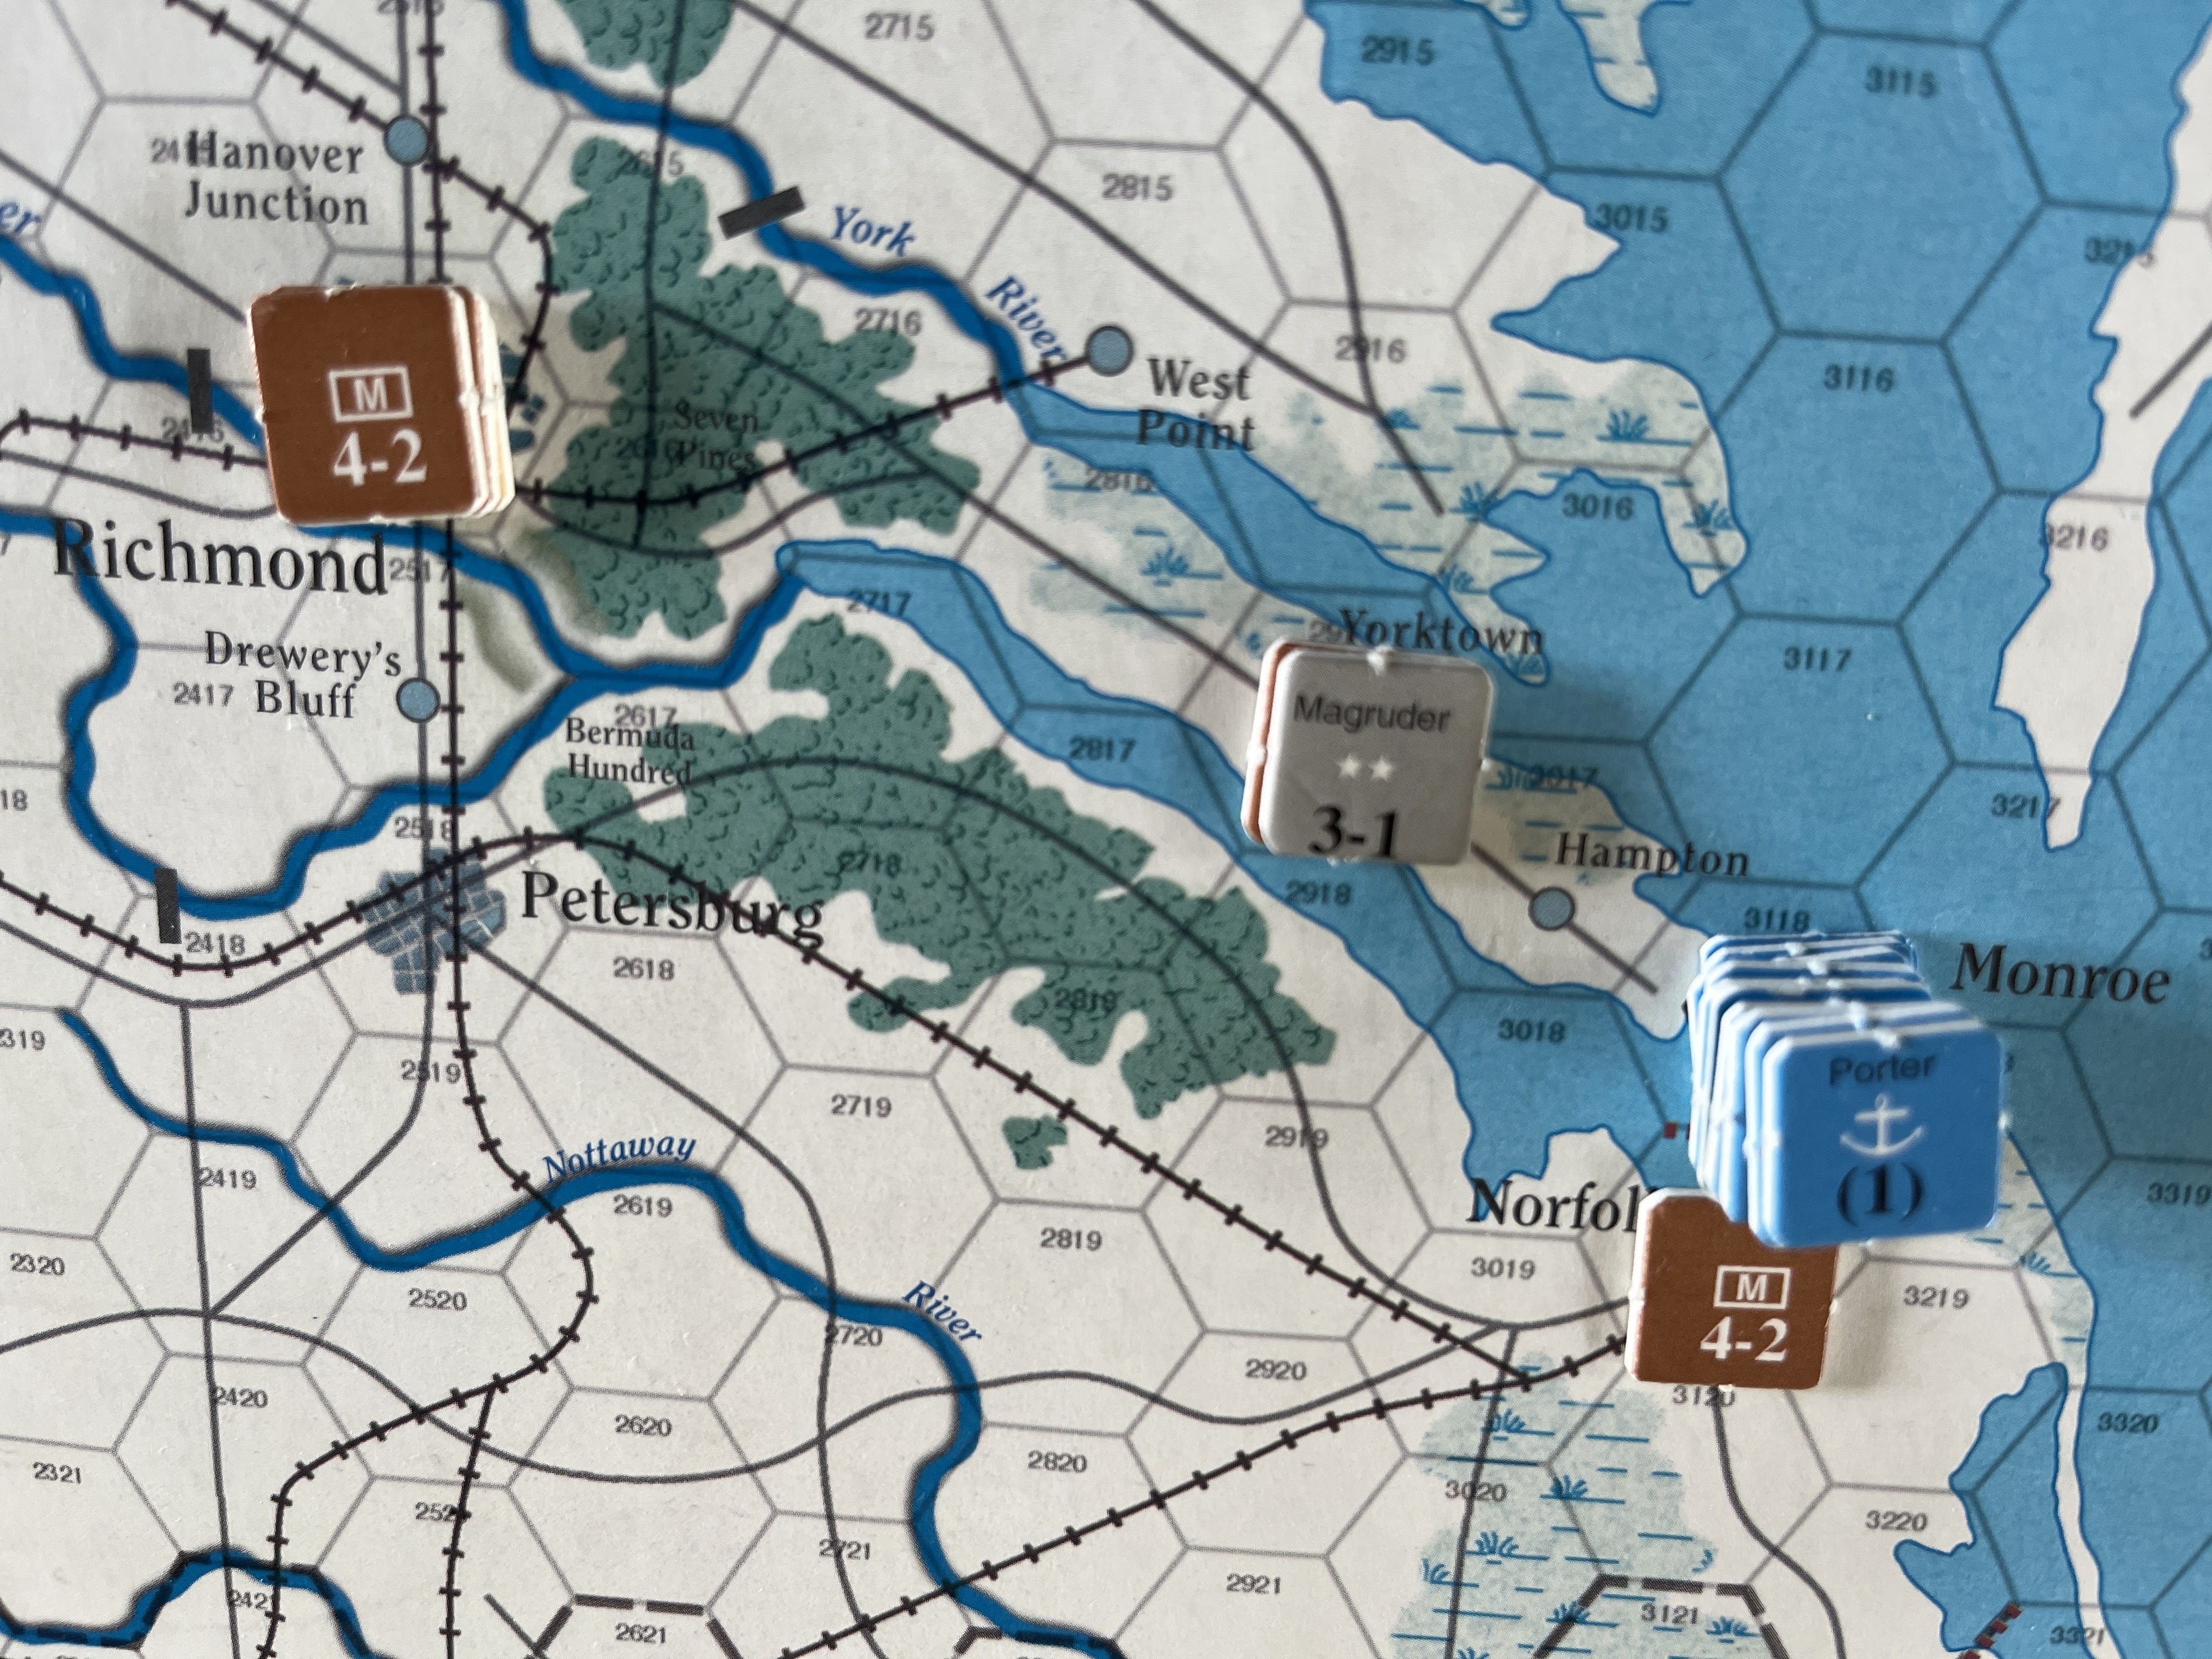
C2108 Yorktown Magruder**3-1, I4 (2 x 4-4 PT NE, with Norfolk notionally 2-5 SB-F PT) 

C2516 Richmond DepNorthVirginia, Fortifications Projects (see above - month 1 24 " fieldworks), M2(PT0), G3 (PT0) (4-4 PT(0)  NE, 6-4 PT(0) NE 2-5 SB-F PT) 

C2512 Aqua Creek M4  (2 x 4-4 PT NE) 

Confederate Production Spiral 

Completing :-

9/61 15 Infantry Points, 6 Cavalry Strength Points (Confederates should receive Hood's Texans 6-5 shock base as one time "ugrade" - select counter), 5 x M2 

10/61 1 River Flotilla, G2, G2, G3, G3, RT

11/61 I3, I3, I4, I4, I10, I10, I3, I3, I3, I3, C2, G10 

12/61 RF, RF 5 x I2(PT1), C2, 2 x I2, I3


Confederate Rail Transport Points 

8/61 - 10 Cap 

Confederate Remaining Supply Points 

8/61 -  23


Union Order of Battle following Move Phase 2 of 7/61 

Gulf Coast 

B4017 Fort Pickens (Blockading Pensacola), G1, X2 (2-4 PT NE, 48" Field Works, 2 x 2-5 SG-SB)

Missouri  

A2712 St. Louis, , DepMissouri, X2, M2 (PT0), G4(PT0) (4-4  PT NE,  2 x 4-4  PT(0) NE 24 " field works, 2-5 SG-SB final works instalment 10/61).

A 2014 Rolla   I1 ( 2-4 PT NE & 1st Iowa The 4-4 can be  ) 

A2414 ST5

A2415 I5 Heintzelman ** (2-1) 1st and 2nd US Infantry Regiment) C1 (US Regular cavalry) (Sigel 5-6 (now crack), Sturgis Cavalry 1-5 (s), Totten 2-5 SB-F PT 4-4 PT NE Deitzlers 1st and 2nd Kansas infantry - now in the I5

A3109 Cairo M4 (2 x 4-4 PT NE Ohio Regiments/Indiana tbc) McClellan*****1-5-2, M2, RT,RT ST5 (4-4 PT NE 4-4 Col John Thayer's Brigade 1st Nebraska and 58th, 68th and 76 th Ohio Regiments )

Ohio & Indiana

A5309 Cincinatti, Dep Ohio M2(PT0), G4 (PT(0) (3x 4-4 PT(0) NE, 2-5 SB-F PT) 

A3005 Springfield M3, M3 (2 x 6-4 PT NE)

A6004 Columbus, M3, M3 (2 x 6-4 PT NE 2-5 SB-H PT) 

A4506 Indianapolis, M3, M3, M2 (2 x 6-4 PT NE, 4-4 PT NE, 2-5 SB-F PT)

A3915 Evansville, Stoneman (** 2-1), DepCumberland, M2(PT0), G4 (PT0) (3 x 4-4 PT(0) NE) 

Virginia/Middle 

C0612 Charleston (West Virginia), I4 (2 x 4-4 PT NE, 2-5 SB-H PT together with next) 

C1311, I4 (2x 4-4 PT NE)

C2206 Harpers Ferry, Depot 5-10 I5,  (2 x 5-4 PT NE,  2-5 SB-H PT) 

C2608 Washington DC,  Hallek ***** 1-2-0, I3, M4, G1, ST6, X2 Fortifications Project (see above) month 1 24 " field works  (6-5 (I3 - 1 st US Infantry) 

C2508 McDowell***2-0, 1stCorpsHQ, I9, I6, I6, I6 (3 x 6-4 PT NE, 2 x 6-4 PT NE, 2 x 6-4 PT NE, 2 x 4-4 PT NE, 2-5 PT NE, Corps Artillery 2-5 R-F, Divisional Artillery 2-5 SB-H, 2-5 SB-F  PT. Again "F" can be spread out as DG attributes to bases at the cost of 1 artillery point per 2 bases. 

C2609 Alexandria, I5 (6-4 PT NE, 4-4 PT NE)

C2806 Baltimore, DepMiddle, Banks ** 1-1 M2 (PT0), G4 (PT0) NT (at sea just) (3 x 4-4 PT(0) NE,  2 x 5-4 PT NE, 2-5 SB-H PT) 

C2601 Harrisburg, M2, M2 (2 x 4-4 PT NE)

C3401 Philadelphia, DepEast, M2(PT0) G4 (PT0)  (3 x 4-4 PT(0)  NE) 

C3118 Fort Monroe, Butler****0-1-0, Porter(1)(Naval Leader),  x3 (specialist works - see above), M3, M3, M3, Depot 8-10, NF, NF (48 " Fort works (12" each side), 2 x 2-5 SG-SB), 3 x 6-4 PT NE, 4-4 PT NE)


Union Production Spiral 

Completing;

9/61  1 River Flotilla, G11, 4 x I5 (Union should receive under the V&B campaign rules the 1st and 2nd US Sharpshooters each of which is represented by 2 x 1-5 ss infantry skirmish stands - These stands have a 6" range, and hit on die rolls of 5 or 6 when engaged in fire combat. If engaged in melee, they hit on a 6. The stands for each regiment must be in the same divisional counter so I can designate from the I5 counter arriving in 9/61) 2 x RT, ST, 4 x M2, M3

10/61 C2, 3 x C1, 1 Naval Flotilla, 2 x NT, G20

11/61 I10, I10, I2, 4 x I4, I3  2 x NF, 2 x RF 

12/61 5 x C1 I2(PT1) I2(PT1) I2 (PT1) I5, I6 


Rail Transport Points 

8/61 - 21 Cap 

Union Remaining Supply Points 

8/61 - 122 

Next Step - Week 1 of August (8) 1861


Saturday, 12 August 2023

The Painting Project - 10 mm


I am all set with my rules and in theory I can lay out the map and kick off with the first moves for July 1861. As I will be converting some or all of the battles to the tabletop I will need to crack on now with the painting project. It is possible that a Manasses junction sized battle could occur within the first couple pf moves. 

The distance between Washington and Richmond is 108 miles but on the map from the outset a fairly sizeable force of Confederates under Beauregard is protecting the approaches to Richmond just two hexes or 20 miles South of Washington. With reinforcement from Jo Johnston at Winchester that could create a battle with perhaps 30-35,000 men on either side (30-35 map counter points). A brigade stand represent up to around 2-3,000 men depending on the number of strength points assigned under my Volley and Bayonet transfer system from our counters. I will need probably 15 Volley Bayonet bases for either side as well a small amount of cavalry for the confederates in the East and both sides in the Kentucky/Missouri/Tennessee area at the outset of the war. So in terms of my actual 20 mm square bases populated with 4 figures around 50-60 for each side. 

I am considering a system within my "trays" of depicting the strength points for infantry brigades by the number of bases at the outset. So a normal 6-4 or 6-5 brigade would have 6 bases in the tray at the outset and a 4-4 brigade base say 4. That will require me to paint and flock base blanks but that is a very quick process. I think it's a good way to reduce the burden at the outset and have a useful depiction for me from the start on the table and not on the roster sheets of brigade strength. 


I currently have 4 full bases of confederates - or 24 stands. I am ashamed to say that after all this blog mileage I have barely begun with my union figures. In a good painting session of 2-3 hours I can usually create a full brigade base. Even if I can get in a painting session say 3 times a week then this is going to take me 5 weeks for the union army with perhaps another couple of weeks for ancillary units and terrain and about 3 weeks for the confederates and again a couple of weeks for ancillary units. So the quickest I could get Manassas on the table from where I am now is 3 months - so probably around Christmas realistically. I could put in a few monster sessions - I am retired and also I could try some real speed painting. Some of my stands I agonise over and paint straps, canteen bottles  and so on. There is school of thought that 25 % of the bases could be pick up ogle level and the rest just painted to be good from a metre away. They say you paint the unit and not the figure at 10 mm - so flags -clear bright colours - perhaps nicely washed faces and hands and glistening bayonets. At 15 mm with my ancients (I have a sizeable DBMM army) I have very much realised that shields, faces and spearpoints are the key and a couple of highlights on forward thrusting limbs/knees or cloth details to get a "pop". 

I think I need to order now perhaps 10 artillery bases worth of figures for each side with various types of smooth bore and rifled field and heavy pieces. I will aim for 3 or 4 brigades of cavalry for each side. These look best in mounted and dismounted formats with horse handlers. 


I think probably for my first battle I will need to create the Manassas battlefield but I will leave over scenery for a future post. Ah Zoaves ! I will need some Zoaves to cradle Reynolds on day 1 of Gettysburg if we ever get there ! 

See you in hell Billy Yank ! See you in hell Johny Reb !


The Confederate Deployments in the East - July 1861


Into the home straight now for the initial deployments. I am wondering whether (a) anyone will ever see or read this or (b) make a comment. I won't bore you with the IT details but I have had problems with every website I have ever built with people being able to find them or leave a comment etc. Initially this is for me - a record or my project so if I ever get to January 1862 and have done two dozen tabletop battles and things are going swimmingly with the system I will hire an IT consultant so that it shows up on Google and can be read and commented on. 

Back to the final deployments in the War Between the States Decision Games/Volley and Bayonet mash up. We are with the confederates in the East. I quite like the look of major deployments on the big map being shown by my generic  Johnny Reb sized 20 mm square command stands. July 1861 and the centre of both political and martial life in the South has centred on Virginia. It is the most important City in the confederacy from a military/industrial point of view hosting the famous Tredeger ironworks (which in turn hosts the American Civil War Museum - a trip for me someday). The ironworks provided fully half the cannon for the Confederacy throughout the war as well as the iron plates to armour the "ironclad" CSS Virginia which battled in the Hampton Roads. Richmond was of course the capital of the Confederacy and the "seat" of the President Jefferson Davies. 

There are three substantial deployments in the East for the Confederacy at the commencement of hostilities. The main forces of course concentrate early on at Manassas Junction to oppose McDowels early invasion "Old Virginia". Beauregard **** (3-3-1) is in command of a Corps HQ counter so will be able to command three divisions attached to the counter and one additional leader (who in turn may command additional divisions) or another division. So 4 or more divisions dependent on whether another ** or *** leader is coupled to the command. The command rules are quite complex and I have adopted the historical variant in the Decision Games "living rules" as presumably this will produce either a more balanced or historically accurate simulation. The basic version allows for random draws of leaders from leader pools which leaves too much to chance. 

Along with Beauregard at Manassas junction are a 4-3 division and two further 3-3 divisions and 1-4 Cavalry brigade and four supply points in a train counter. There are also five 2-4 brigade counters.As far as the divisional counters go I do not think it good to reduce the the 3-3 divisional counter to two very understrength 3 pointy brigade bases for V&B on the tabletop. As a preference each will be represented as a single 6-4 PT NE base. The 4-3 counter can break down to two 4-4 PT NE bases on the tabletop. I have represented this in the photo below - fully 10,000 bayonets ! The final five two point counters can appear as 4-4 PT NE brigades. 

The cavalry brigade is presumably Stuart's cavalry across from the Valley. Still over in the valley at Winchester Jo Johnston **** (3-3-1) commands a 4-3 division and three further 2-3 brigade counters. Without a headquarters unit he is limited to his command span of 3 which will allow him to command the 4-3 division and two of the further brigade counters. You are not allowed to simply "merge" unit counters in the Boardgame as I understand the game so command and control and the use, generation and husbanding of leaders and HQ counters becomes crucial. In the Volley and Bayonet campaign the initial "corps" raised in Winchester is the Army of the Valley and has a better trained brigade (5 morale and not poorly drilled at the outset). I am assuming this includes the VMI and locally well drilled militia in Jacksons brigade. I don't think the counter mix is going to allow me to present a 6-5 elite division without leaving just 2 spare base points (1 counter point) from the 4-3 divisional counter. I am going to reduce the 4-3 counter to a 3-3 counter initially which will model as the "first" or "stonewall" brigade/division on the tabletop - so 6-5 and not poorly trained and including elites. One of the three 2-3 counters can then be bumped up to a 3-3 which would be a 6-4 PT NE on the tabletop leaving two further 4-4 PT NE brigades. I think my Mannassas concentration will amount to a maximum of 13 brigade bases representing about 31,000 men which seems historically correct. This will be dependent on the Confederates getting a chit move (guaranteed moves) score of at least I think 3 or 4 and/or attempting a 50 % roll against Jo Johnston's initiative (3). I have described my debates over whether to allow rail or road movement as a reinforcing reaction to a battle within a weekly cycle. I will revisit the issue and cross that bridge I guess on turn one. Historically we know that the Confederates were able to force march and use rail transport to concentrate at the Manasses Junction by 21 June. Presumably the 3rd weekly turn of our 4 turn cycle in July. 

Will the Union attack at the outset and risk a full-scale battle ? Historically McDowel was unable to resist the pressure from the public and Lincoln to undertake an early adventure. It took 3 or 4 days to cover the twenty or so miles to Manasses junction (with stops for berry picking and picnicking of rations en route) but a single night in the "big Skedaddle" to stream back across the Potomac into the boulevards of the capital. The union has to attack at some point to fulfil its war aims and bring its greater material to bare. 

The final deployment is of Magruder ** (2-1) who can command a division and a brigade counter on the peninsula at Yorktown. The boardgame gives the confederates one 3-3 counter at that location which I expect should be modelled as a single full strength brigade 6-4 PT NE.

Again I will distribute appropriate artillery on the tabletop which I will then track as we go along. I think on average  7-9  + counter strength points  (14-18 brigade base points) should support a divisional artillery brigade and where there is a concentration equating to a "Corps" (with or without an HQ but definitely when a leader is present so an organisation) then we might include a command artillery brigade as well. 

There are 5 further locations with militia concentrations varying from 2 to 8 points - In the West Virginia mountains near Romney and also near Staunton, at the rail head at Aqua Creek, Richmond and Norfolk. There are small garrisons at Fort Sumter and Fort Pulaski protecting Charleston and Savannah respectively and Forts Hatteras & Clark off the coast. 

I can now set up and photograph the maps and counters and describe the war aims/victory conditions for the North initially and their expected strategy. 


Thursday, 10 August 2023

Irvin McDowel & The Army of the Potomac and Union Forces in the East


Above : McDowell (see site footer) 

May 1861 sees the formation of the Army of North Eastern Virginia based in Washington and led by Irvin McDowel. This first large concentration of Federal forces in the East was defeated in the First Battle of Bull Run or First Mannassas on 21 July 1861. The army that assembled at Bull Run numbered around 35,000 and was organised into 5 divisions with 3 to 5 brigades. 

The Army organisation is represented initially by stacking the 1st Union Corps HQ with McDowel's command counter. Generally each Corps in War Between the States can contain 3 divisions. McDowel is a *** General and can command a Corps HQ as well as one additional division counter. Without a Corps HQ counter/organisation a *** General is limited to commanding two division counters directly. As the counter limit allows for only four ten point or nine point divisional counters only in each sides mix in the campaign game to prevent ahistorical "super armies"  a *** Corps level commander with an HQ counter would be limited to commanding roughly 36-40,000 troops. So just a little in excess of the numbers at First Bull Run which seems then realistic in the first set up for the Board Game and our campaign. McDowel is not a particularly gifted commander - he has an initiative of 2 and a combat rating of 0. 

It would be as well to swap in McClellan fairly rapidly. McClellan has a lower initiative (1) however he has a command span of 5 which would allow him to command a headquarters and its units and up to 4 other leaders with our without their command counters. New Corps HQs are created in some months on a roll of 1 (and then up D6 Corps HQ counters). From the outset then if the Union can move "Little Mac" to the East he could command the Corps HQ with 3 divisions as well as 4 other leaders. ** Generals could in turn command a division counter and a brigade (One or two counter points of infantry) and ** Generals can command 2 divisions. At a stroke the size of the Union Army of the Potomac as it was to become could be increased to I think 108,000. 

Initially though in July 2016 as the campaign begins the forces arrayed at Washington consist of three 6-3 divisional counters, a single 3-3 division, four Militia points and two garrison points. The Union forces are about to immediately receive a further leader reinforcement in the form of the Divisional commander  Heintzelman ** (2-1) and ten militia points. On that basis at least 3 single points will need to be distributed to 3 other Union departments but fully 7 militia points could be stacked with the new Army of the Potomac. 

The regulation newly "Corps" for tabletop V&B for the union consist of two divisions (not 3) of 3 brigades 6-4 PT NE. The Corps has an assigned  reserve artillery brigade (2-5 R-F  PT (rifled field piece like a Parrot gun I expect)) and each division assigned artillery (alternating 2-5 SB-F PT and 2B-H PT). On that basis each 6-3 divisional counter can be modelled as two 6-4 PT NE brigade bases (so four in total) and the 3-3 division one further fun strength 6-4 PT NE brigade. With a large body of troops I will assign Corps artillery and at least  two sets of divisional artillery brigades (possibly though 3 or 4 initially given the presence of 4 divisional counters and the addition of militia up to 11 points of militia). The total field strength of the army at the start of the campaign will likely be 32,000 men. I would need something like 11 brigade bases to model the army. I currently have no union brigade bases made but the figures have arrived from Pendraken. 

This is the main Union army. Banks force at Harpers Ferry is represented by two 6-3 Divisional counters which can be modelled in the usual way. I believe there are a couple of further US Army regular brigades which in the V&B campaign start at Pittsburg (4-5 so they do not start green/poorly trained). I think I will place one of these at Harpers Ferry and the other within the main forces.  Apart from various militia and the odd fortress garrison (Fort Monroe in particular at the end of the Yorktown (James/York Rivers) peninsula) there is a 5-3 infantry counter just across the river Potomac in Alexandria. 


Butler **** 0-4-0 (no initiative or combat rating but 4 command span) is situated at Fort Monroe with 9,000 Militia poised to strike at Richmond. The Fort itself was used to base Mclennon's  Peninsular campaign in the Spring of 1862. A giant flanking manoeuvre on Richmond the confederate capital itself. While Fort Monroe remains garrisoned and threatening the confederate flank in Virginia  it will always tie down confederate troops. It's quite perplexing as to why the Union did not persist with what was otherwise a good strategic idea.On the map below from 1862 you can see the position on Butlers troops where he commanded from April 1861 to July 1862. The fort represented an excellent anchorage for the union Navy which is represented by two naval flotilla counters. The Confederates will at some point need to develop a navy of its own and Iron clads to take on the union dominance of the rivers and tidal and coastal waters. But is the expense worth it. Once I have posted with the initial confederate deployments in the West I will set up the map and take some photographs and discuss initial strategy from the Union and Confederate perspective. 


(1) Polk at Memphis - The "Sword over the Gown" (2) Remaining Confederate forces in the West and (3) the Volunteer Call Ups and Supply


Above : Leonidas Polk - Bishop and slave owner (see site footer) 

Leonidas Polk the Episcopalian Bishop when asked if he was giving up his Bishopric to take up a senior position in the Confederate command responded "No - I am buckling my sword over my gown". Polk was the former West Pointer, then Bishop and large slave owner appointed by Jefferson Davis at the outset of the war to command "Department Number 2" which comprised Kentucky and Tennessee. 


Now in uniform he committed one of the greatest blunders of the War deciding to push North from Memphis and to occupy Colombus Kentucky. Kentucky which had declared its neutrality at the outset of the war promptly invited the Union forces to "expel" the invading Confederate forces. The Confederates were unable to secure Kentucky's secession or even occupy its territory convincingly at any point.

We find Polk in fortified Memphis on our map commanding a small cavalry division and two small divisions of regular infantry as shown below - some 2,000 cavalry and 6,000 infantry. Without an HQ counter Polk will be able to directly command two divisional counters under the variant leader campaign rules for War Between the States. So that's a guarantee of two of these counters moving if Polk is commanded using one of the Confederates assigned initiative points. The remaining counter could also take up an initiative point from the weekly "chits". Alternatively the points could be saved for movement elsewhere and Polk's own initiative of "2" could be rolled against to see whether he is able to move two divisional counters. This would I guess simulate delay and prevarication of a number of weeks. The limited resources of movements represented by the weekly chit draw of moves from a cup presents a very real limit on the available strategic resource or planning juice at either sides disposal. 


The above counters would model as two 2-5 Cavalry bases which would dismount as linear infantry. I expect the two divisional counters should be stands as 6-4 PT NE with an assigned artillery brigade or "DG" assigned artillery with each base and a 1-5 Artillery battery base. Polk has a supply train with 2 supply points. The counter would represent the wagon corps and supplies of food and ammunition. There is also river transport available to Polk. 

The remaining confederate forces in the West are as follows :-

  • 6 militia counter points at Little Rock Arkansas together with a supply train loaded with 3 supply points. I expect that I would model these as three bases 4-4 PT NE with "DG" and a battery artillery base or a brigade of appropriate guns.
  • There are small contingents of Militia or small garrisons stationed at towns or in fortifications at Mobile on the Alabama coast, Pensacola Florida, Fort Morgan and New Orleans. There is further river transport at New Orleans. 
Resources for the confederates in the West are limited. The production spiral will provide 8 militia strength points immediately in July, 15 garrison points in August and 15 infantry and 6 cavalry points by September some of which can be sent to the Western theatre. The production rules require resources to be spread (not necessarily evenly in some cases) between departments. 

The confederates begin the war with a bank of 200 supply points and begin with 40 further supply points each strategic turn from their Major cities and a handful of supply points imported through seaports. We can discuss the Union "Anaconda" strategy for blockades and denial of the Mississippi in a future post as the campaign commences. 

It terms of the personnel points the first Confederate call will produce 80 points in July which will tail off through the year. Both sides face tough choices as to how to call up or draft further troops to keep their war machines supplied. These political decisions can impact negatively on the victory system which relates to war events both on and off the battlefield. A negative reaction to drafts or a positive reaction to deferring that decision can result in the European powers joining the side of the confederacy or e.g. Missouri or Kentucky seceding. 

So in July 1861 the confederacy should begin immediately with 80 personnel points and an augmented bank of roughly 255 supply points (40 from the Major Cities and a further 13 from import points - Pensacola and Norfolk begin the game blockaded). I love the Production Spiral in the campaign for the boardgame and I will adopt the system wholesale to both generate new brigades (create)  and to restore to strength existing ones (augment) or change (convert) garrison and militia points into regular infantry points.  As an example a single infantry point (1,000 men or 2 points for a V&B base on the table top) costs 3 personnel and 2 supply points. So a full strength  tabletop brigade base at 6-4 which requires a 3-3 counter to be placed on the board would cost 9 personnel points and 6 supply points. It's the raw man power which seems in short supply for the confederacy. 80 in a single hit in July 1861 is the biggest number of personnel points that the confederate states ever get - even the first draft will yield only 60 points. In comparison the Union receive 100 at the start of the first call track (it reduces by 10 each month) and 90 for the second. The confederates second volunteer call only attracts 50 personnel points.

By far a more efficient way to generate regular infantry is to return militia points to the spiral and expend just 1 supply point. They will appear as regular infantry counters with an identical points value 4 months (strategic turns) later - so initially then in November 1861. Further whole infantry divisional counters can be placed back on the spiral to be augmented with further points at a cost of 1 personnel point and 2 supply points. Overall if new Militia is raised it would cost the same once converted to infantry however it would appear in 5 months rather than 8 months. 

Other units such as ironclads, siege guns and naval bases are eye wateringly expensive for the confederacy. There is a harvest in the Summer or Autumn after which the confederacy gets a seasonal boost to supply points (3 per City retained for example in September 1861 which would produce an additional 200 points. This does not compare however with the way that the Industrial North churns out 150-300 supply points turn after turn throughout the war. 

Now I have looked at the deployments in the West for both sides I can draw my attention to the Eastern Theatre. The major theatre of the war throughout the four years of war. The first and last major battles of the war were fought in the East with Virginia as the front line. 

Confederate Forces in the Border States in the West July 1861


Above : Planter and Slave Owner, former Governor of Missouri Sterling Price (see site footer) 

The first Confederate command to put in place on our Western Theatre Map belongs to Mexican War veteran and former Governor of Missouri Major-General Sterling Price. Despite Price being  a tobacco plantation owner and slave owner he originally and publicly opposed to Missouri leaving the Union when the Deep South seceded. All the while however Price who led the State's militia was conspiring in private to sieze the arsenal in St. Louis and to take Missouri out of the Union by force. This led to the initial collision with the forces of Union general Nathanial Lyons discussed in an earlier post. Lyons attacked Price's camp at the battle of Wilson's Creek on August 10 1861. Price Counter is ***(2-1) so initiative 2 and combat value of 1. I am using the historic leader counter rules with leaders appearing at their historic times. I guess if you root for the South you will want to Jackson to survive Chancelorsville and for the North for Reynolds to survive the first day of Gettysburg. 

Prices forces are based at Rolla and consist in counter terms of a regular 2-4 cavalry division and four M1-2 "points" of militia. On the V&B tabletop these will convert to two cavalry brigades (2-5) which will dismount as linear infantry with a single point being able to operate as skirmishers. Our miltia would begin life as a single M4-2 counter with 4,000 troops modelled as 2 x 4-2 brigades PT/NE with probably a DG attribute each and/or divisional smoothbore guns as appropriate in the same manner as the union forces (I will not set out my artillery equivalency for every force from now on but these will deploy as per my initial theory in line with confederate artillery strengths in the model V&B divisions and operate as designated gun "DG" attributes or on table artillery brigades or small batteries. 

The only other confederate deployments on MAP (which broadly covers  the border state theatre of Arkansas, Missouri, Tennessee and Kentucky are two more militia deployments of 2 counter points respectively (which will model on the tabletop as brigade bases 4-4 PT/NE possibly with "DG") at Nashville, Tennessee and New Madrid on the Mississippi. The confederates make a strategic mistake in the early war by entering Kentucky. Again the confederates will need to consider whether they should honour Kentucky neutrality or take the risk of entering the State which will push it firmly into the Union camp as I understand the rules. 


Reworked Order of Battle for Union Forces First Mannassas

Above :Union Infantryman (US public domain image)  I have completed the Fire and Fury OOB for the confederates using the more detailed stand...