Showing posts with label Nathanial Lyons. Show all posts

Friday, 3 November 2023

The Battle of Rolla - 7 July 1861 - Lyon versus Price


"You will soon be in a pretty hot place... but I will be near you, and I will take care of you; keep as cool as the inside of a cucumber and give them thunder !" General Sterling Price 

"In less than an hour they will wish they were 1,000 miles away" General Nathaniel Lyon 

(Wilsons Creek)

(above; Lyon leads the Union infantry column from Jamestown where it has detrained along the road towards Rolla and the waiting Missouri State Guard of Sterling Price) 

These two quotes are from  the commanding officers at Wilson's Creek which took place in August 1861. My campaign uses a historical starting position for units across the main theatres of the American Civil War and the logic of strategy has again thrown these two combatants together on the tabletop. At stake the confederates forward position in the Trans-Mississippi and Missouri.  For Both Sterling Price and Nathaniel Lyons this is deeply personal. Lyon the hothead abolitionist and former commander of the 2nd US infantry who thwarted Price's plans to seize the arsenal in St. Louis.  Price the former Missouri State Governor and a slave owner and planter. After a decade of bloodshed next door in "bleeding Kansas" over the issue of slavery Missouri rapidly erupted at the very outset of the Civil war. 

As a quick recap this battle is taking place in week 1 of the July (7)1861 turn at Rolla. The on-map counters represent two small mixed forces of infantry and cavalry totalling 6 and 4,000 men respectively. 


My Order of battle for the Volley and Bayonet tabletop battle picks up known units from the forces in the State at the time. You can find a fuller description of the characters and units I have imported into my battle of Rolla here in a prior post.

I can show the Order of Battle with my new labels which I have printed up in smart Union Blue and Confederate Grey.
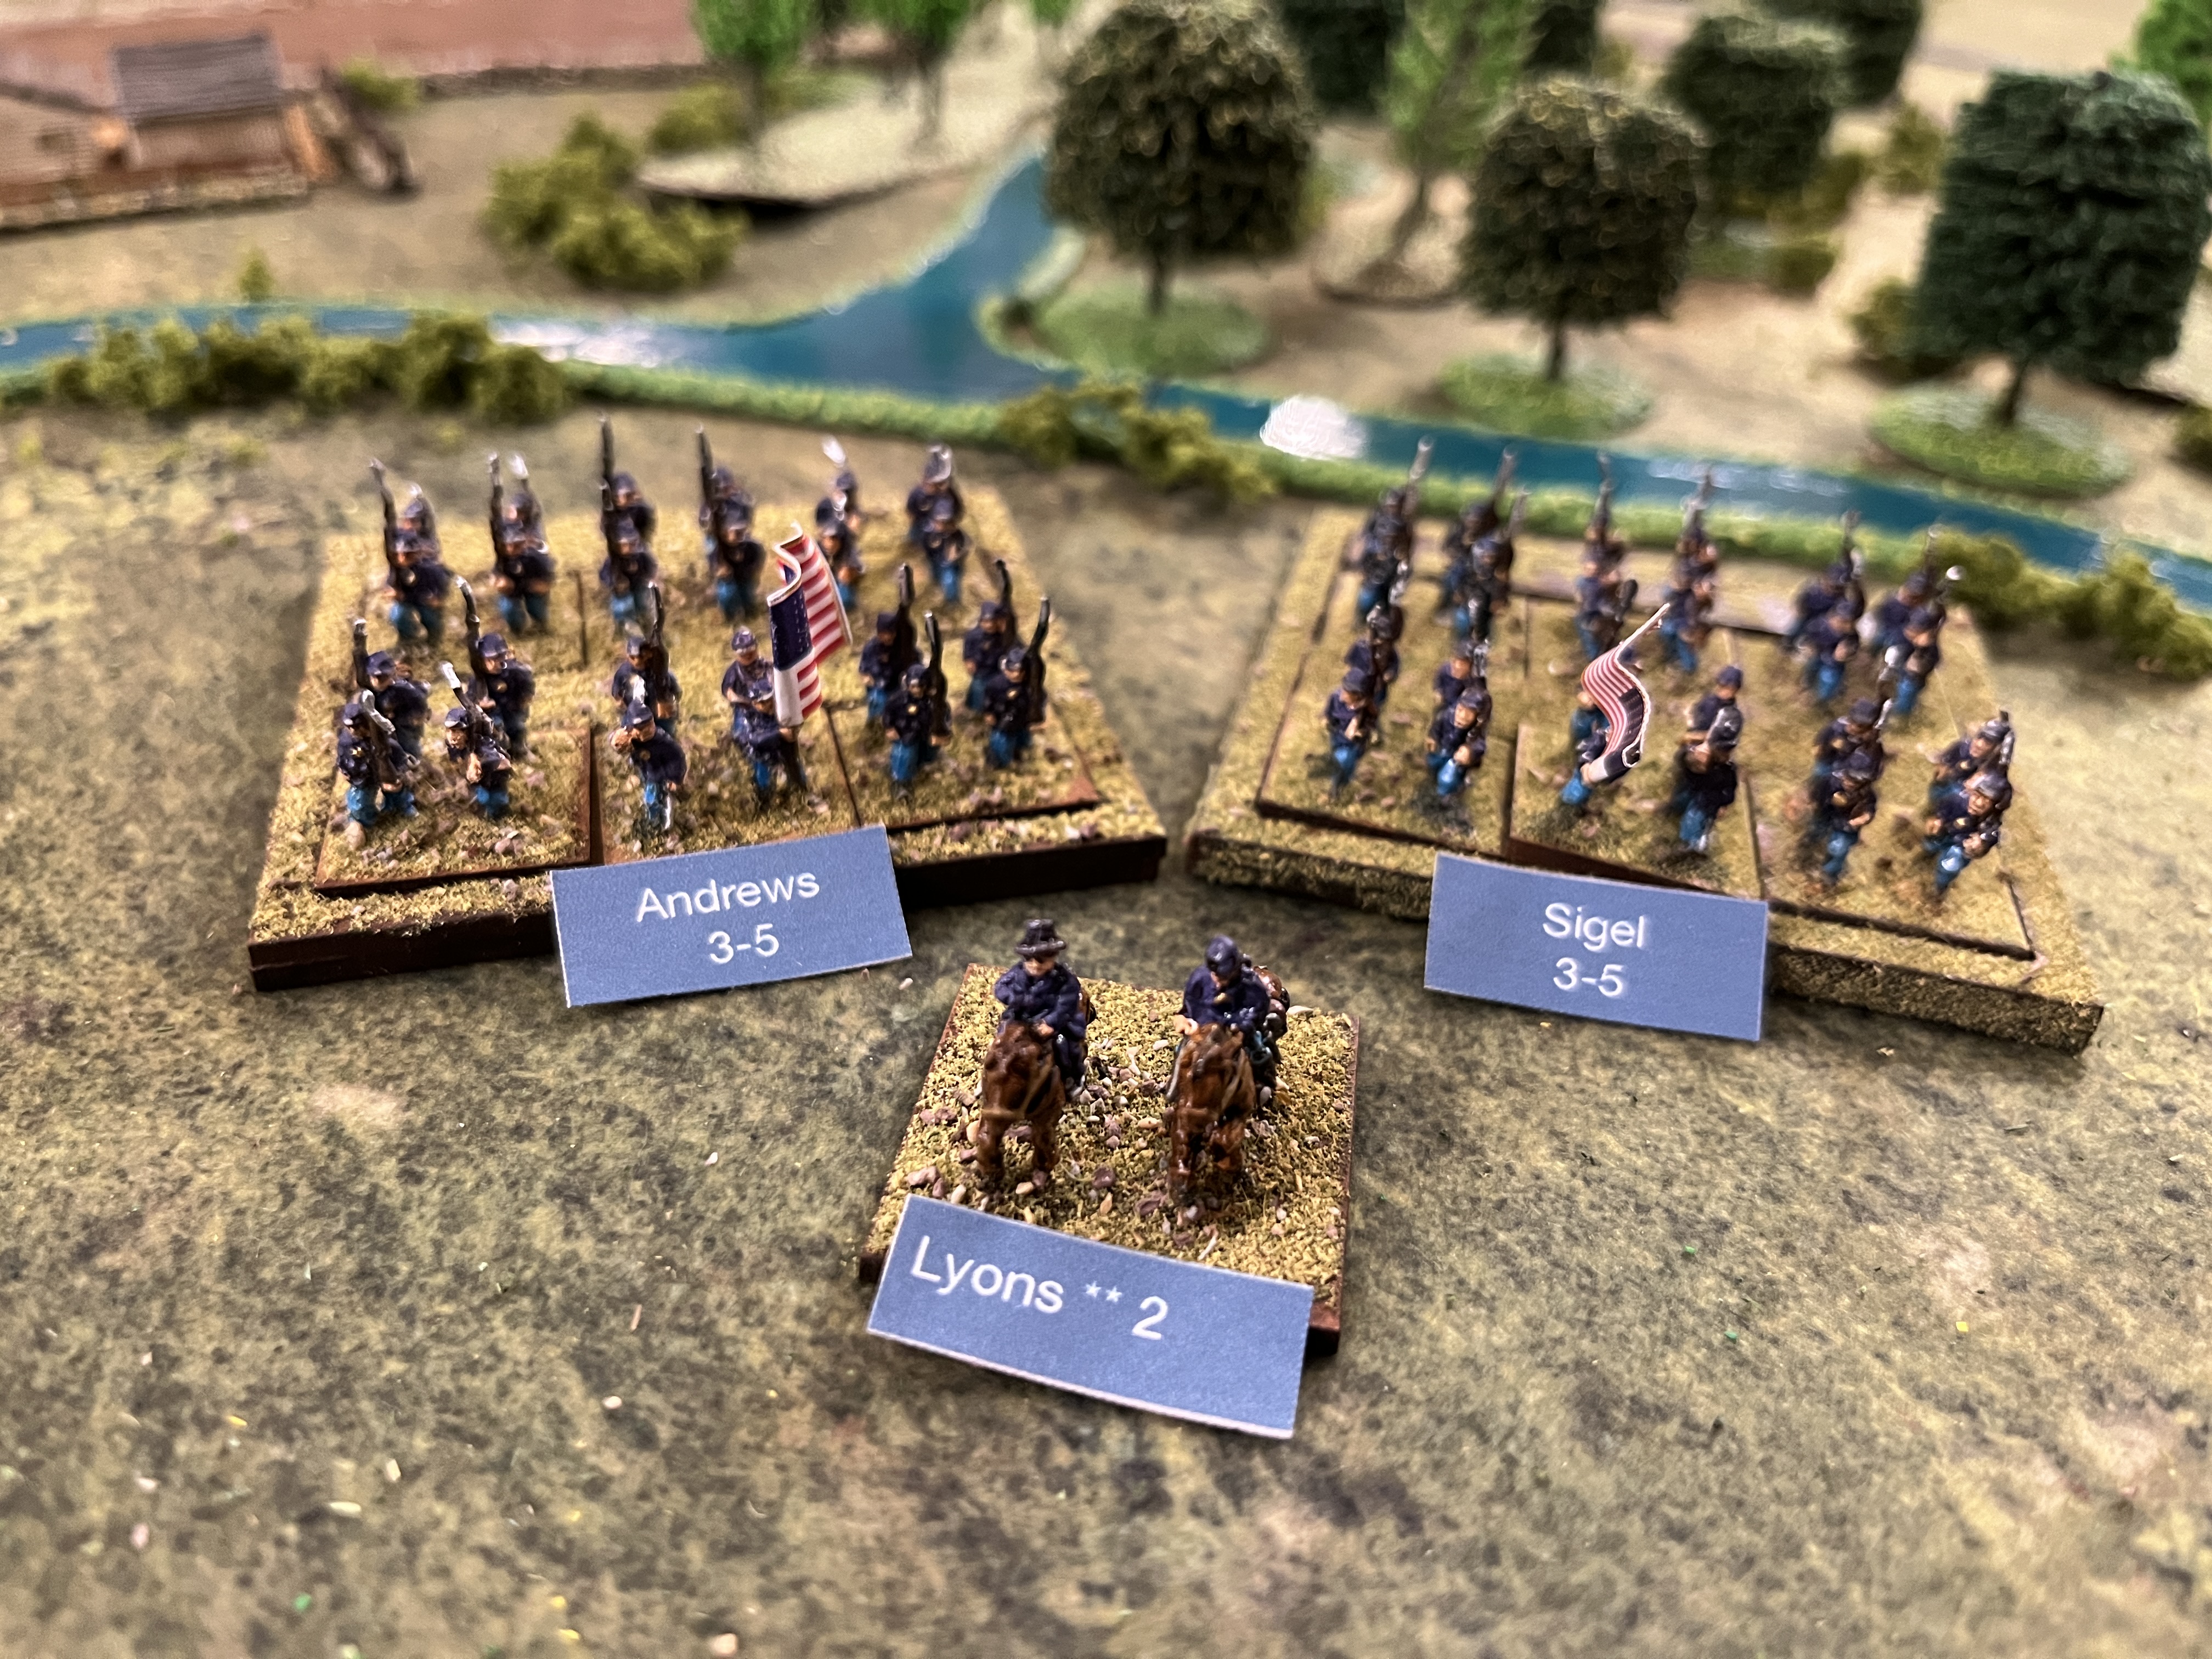

The I3 counter breaks down into two 3-5 brigades. The counter is stiffened by the presence of regular US army troops hence its higher starting morale at the onset of the war. Switching between strength points in counters and strength points on the tabletop is relatively easy as they translate as 1:2 (1,000 to two lots of 500 men). The whole Union force will operate as a single command under Lyon who has a combat strength of "2" on his WBTS counter . I have decided that this should receive a +2 for morale if he attaches to a unit (similary Price will provide +1 for his combat rating from WBTS - this is the normal modifier for an attached divisional commander in Volley and Bayonet in any event). The translation from map to tabletop won't always work for leaders present etc. but I will do what is sensible to get it on the table and then translate the result back to the counters. It is as much story as science - we must never forget that we are grown men (usually) who paint model (read toy) soldiers and wargame (read play) with them.  


The C1 counter for Sturgis' small cavalry contingent is represented here with my mounted and dismounted (linear) bases - 2-5 [s][s] At Wilson's creek Sturgis took over command from Lyon who was killed leading an infantry regiment. Sturgis' base can break down into 2 dismounted square skirmisher bases as per the V&B RtG post Napoleonic rules for "light cavalry" noted in the V&B House Divided campaign rules (which I can find as version 4 online). This is a linear infantry base when working both bases work together. I am nothing if not proud of my new dismounted cavalry bases complete with horse holders.


Finally not represented as a counter but modelled within the division are Totten's artillery. I have not yet modelled the limbered units. 


The M4 map counter breaks down into two 4-4 PT NE brigades. The infantry regiments of the Missouri State Guard are poorly trained and have No Elites so will suffer a disadvantage in melee on a drawn roll. I have not made up a command base for Price but have stolen the command base from a spare Missouri cavalry unit. 


The C2 counter breaks down into two linear infantry dismounted bases for Rives and Cawthorn - 2-5 [s][s]. The first base has broken down into its dismounted skirmishing constituents. The "village" over to the left of the picture above can take a single skirmisher base under the Volley and Bayonet rules. In terms of scenery generally I am playing it very light in terms of features for this first game. Most of the linear features will be treated simply as scatter scenery. Woods, streams, built up areas, roads and hills will have an effect but I have not littered the battlefield with snake rail fence or stone walls which were not in abundance in the "young" lands of the Western theatre. The advice I have picked up generally is "if in doubt" then put on more trees ! I do need to settle on a random generation method. 


I have created this battlefield from the modern day map of Rolla online and google arial photographs stripping back to 1861. 


Here we go ! 

For such a small battle I am just going to have Lyon arrive, deploy and go at it without drawing for wing placement and so on. The Union begins as the attacker. I have placed the lead elements of Lyon's small column alongside the road and railway coming from St. Louis. 


I originally intended not to provide a blow by blow account but I have ended up with a fairly full account of the action. 

Turn 1 - 7 am 

The Union is the attacker and moves first. 

Using the road the two Union infantry brigades form line from march column once across the shallow ford of the Franz Brook. This takes half of their move allowing them each a couple of inches to fan out. The artillery remains limbered. Sturgis' cavalry brings up the rear in march column and forms up when it reaches the ford for half a move. 


There are no morale checks or combat. Lyons must decide whether to advance to meet the union troops. The Confederate artillery is manhandled forward into range and a cautious advance begins. The Union troops come under ineffectual long range artillery fire from Guibor's artillery battalion. 


Turn 2 - 8 am 

The union side advances and both infantry brigades will need to take morale tests for being in close range of the confederate artillery. Both Union brigades pass their morale test. The confederates do not need to test as the Union artillery is not in close range. 


An exchange of fire results in a casualty for Sigel's Brigade and Sturgis cavalry on the union side and on the confederate side for Slack's Missouri Militia. The confederates need to decide whether to charge however given that they are "green" and will fight at a disadvantage in a melee Price decides to slug it out at  range. There are no casualties from the resulting firefight despite the Union return fire being from some stands declared as stationary after their move. 

Turn 3 - 9 am 

Totten's artillery is manhandled forward seeking close range. No other units move. The Confederate infantry is now in close range of artillery and must also test for morale. Sigel's union brigade fails its morale test on a 6 and becomes disordered as does Guibor's confederate artillery battalion. 

The firefight now becomes bloody. Sigel receives another casualty as well as Andrews. Lyons attached to Andrews brigade which made them immune to morale tests however it is a disaster - a second 6 means that Lyons is a casualty. Weightman's Missouri State Guard and Rives cavalry suffer a further casualty. As the skirmish stand is on its own (the second is in the farm/village) it is removed entirely.

Lyons is removed from the battle - the roll for his fate is a simple one. As it is not a melee I do not think a capture option is realistic and as such I perform a  straight die roll - 1-2 he is killed outright 1-4 he is wounded for 1-6 strategic turns. A One! Lyons slides from his horse taking a mini-ball through the neck as he turns to urge his men to pour it into the confederate lines. I swore I would not re-roll, skew or backfill any result unless I have got the rules glaringly wrong. I added Lyons to the combat as I intended to charge at some point and try to rout one of the Confederate brigades. Once the Union brigade had suffered casualties from ranged fire there was a 1 in 6 chance of his being casualty with the most likely result being an injury for a couple of months. I thought the Union could live with that as Heitzleman is waiting in the wings in Southern Ohio. The small union force rode its luck and lost.  I have learnt the lesson the hard way for the Union. Do not attach a commander to a combat unless it is critical and possibly only for a melee. Commanders on horses were obvious targets. Overall there was a fair chance of not surviving the war. 

The Union units will now be permanently out of command for the remainder of the battle which means that :-

(a) They cannot move close to the enemy and only move at half movement allowance becoming disordered if they do so;

(b) They cannot recover from disorder;

(c) They cannot become stationary (not good for Totten's artillery which will now be pinned to rolling a single dice); and

(d) artillery cannot limber and unlimber; 

Already by 9.30 am the union battle plan is in tatters and there is nothing for it but to slug it out toe to toe with the confederates. I am not sure that I actually had any other plan for them ! Without a commander they cannot now press the charge home. The Union should not have been so cautious and delayed the charge. Another lesson learned. 

Below :  the confederate line holding either side of the Jamestown road with the newly built (red) Rolla courthouse in the background. I am so glad I looked this up and painted this. I am going to try and model something every game if I can and grow "the look" as I go on. I didn't manage to get the crops done for this battle but presumably we can still have wheat fields in later in July and August. 

It will be a close run thing. Slack's brigade fails its morale test giving Sigel the opportunity to successfully save against a hit. The return fire from Sigel's brigade is withering causing two more casualties. Andrew's 2nd US Infantry suffers another casualty which totals 5 in all so the Union will need to make an exhaustion throw at the end of the player turn. Cawthorn's cavalry suffer a casualty at the hands of Sturgis' combined 1st US cavalry and 2nd US dragoons. A final defensive salvo causes a final casualty to Slack's Missouri militia who evaporate on the battlefield (the stand is removed with four casualties). The Confederates now total 7 exhaustion with 4 casualties occurring in the current turn.

The Union must roll 2 or more on D6 to avoid exhaustion. The Confederates need to roll a 5 or a 6. As Slack's brigade stream off the battlefield the confederates suffer a catastrophic failure of morale. The entire remaining confederate line is permanently disordered where it stands. Any stands that were already disordered would have routed. The confederate line is now at jeopardy on all future morale throws. 

The ability of any forces to stand and fight on through exhaustion could confer a benefit after the battle in any event for the veteran divisions of the union. 

Turn 4 10 am

Price attaches himself to Weightman's militia regiments to stiffen their morale. All of the Confederate's remaining units pass their morale tests. Sturgis' cavalry fails its morale test. Already suffering a disorder they rout to the rear - they are a linear infantry stand collected together and not skirmishers so do not get removed on the spot). While routing they suffer a further casualty however and are removed from the battle on their "tally". Both lines are now thinning. All stationary markers have now been removed due to exhaustion which will reduce the fire of both sides.


Sigel's brigade and Totten's artillery direct their fire at Guibor's artillery which suffers an unsaved hit (the saving throw is because Sigel and Totten are disordered). Sigel saves a returned hit. There are no further casualties along either line. The Confederates and Union pass the exhaustion test. 

As the confederate skirmishes in the village are out of command they are unable to move out to both get into range and to attack Andrew's brigade in the flank. They can however retreat and suffer a disorder in order to approach once in command (I realise subsequently that this would have caused a rout) All of the Union brigades pass their morale tests. Weightman's brigade fails its test and routs. As it must move 16 inches it will rout off off the table. The confederates survive their exhaustion throw. 


The confederate infantry stream from the battlefield. 

Turn 5 11 am 

Sigel's division is able to advance toward the town of Rolla to take up defensive positions without moving closer to the remaining confederate cavalry on the field of battle securing the town of Rolla and threatening the Confederate supply lines. Once the Union infantry are secure in Rolla it will be next to impossible to remove them with dismounted cavalry. Totters artillery is unable to move and bring its fire to bear on the remaining confederate close order formation on the field as it is out of command and cannot close with Cawthorn's Missouri State Guard Cavalry brigade. It is however disordered and as such would rout if moved while out of command. 

Rives cavalry brigade then fails its morale test and routs. Firing is ineffectual but at the end of the Union turn the Confederates fail their exhaustion test by rolling a 1. As Cawthorn's State guard are already disordered they rout leaving the field. The Union holds the field and the town of Rolla.  Lyon's sacrifice has not been in vain.


Immediate Aftermath of the Battle 

Price's forces withdraw from Rolla for 1 hex taking the road toward Springfield. Thankfully without a leader the Union forces will be unable to pursue and give battle but for now the confederate forces in Northern Missouri that were gathering to threaten St Louis have been checked.


The fight was bloody on both sides. Lyon's leader counter is removed from the Map. The Union side will need to look to bring a further leader across to the Trans-Mississippi if there are to retain any initiative.

I am not sure if I have played the morale and exhaustion rules correctly but I applied them the same for Bothe sides and in any event the confederates failed dice rolls whereas the Union weathered them. The battle could have gone either way. The higher morale of the smaller Union force helped to defeat a slightly larger force. I will check the rules again before I play next time however interestingly I thought I would have a slight Confederate bias in my dealings given my lifetimes gentle immersion in confederate mythology- the truth is I didn't want either side to lose having spent all the hours required to paint them. Too much was at stake in this opening battle in terms of the momentum of events. It was a small interesting battle and got me used to the ebb and flow of the rules and some of the key concepts. 

If I take anything away it is that being stationary is a very good thing in terms of fire power. Again - don't attach leaders who are needed as counters for movement on the campaign Map to firefights ! 

Recovery 

The recovery rules are quite harsh where one side is forced to leave the field of battle without a rearguard under the V&B ACW campaign rules.  There is a lot to be said for withdrawing in good order. A "Rearguard" needs to be an intact battlefield command and neither routed or exhausted. The confederate side cannot recover artillery losses and will then lose all of its artillery pieces abandoned in the field. This feels right. Guibor's Missouri State Guard Artillery is lost as an inherent component of the Militia counter for now. I will need a mechanism for refitting artillery units. The cavalry and infantry will recover 1/3 of their losses only as the wounded are left behind to be captured. I can cross that artillery bridge when I come to re-fight with Price. There is perhaps something about a division being in a department or receiving reinforcements from a department to refresh its artillery. Guns were captured and lost on the battlefield and re-purposed all of the time. For now Price is without his guns as he retreats toward Springfield. 

6 of 8 infantry strength points were lost so the confederate infantry will recover 2 strength points to make 4 in V&B terms. The M4 Militia counter on the WBTS map should be replaced with an M2 which will consolidate as Weightman's Missouri State Guard (1st-4th) M4 PT NE. 

1 of the 3 lost cavalry strength points will be recovered so 2 from 4 will remain and the C2 counter on the map will be flipped for a C1 counter.  Rives base will be lost altogether or its remnants "consolidated" and Cawthorn's State Guard Cavalry brigade (and Missouri Cavalry regiments) will become a single 2-5 PT base. When it is reinforced it can be split out in terms of its components.  Where possible multiple single point cavalry stands or 2 point infantry stands within counters should not exist and should always be consolidated. This feels historical with the remnants of battalions or squadrons being thrown in together locally. The counters at their higher points values are divisions but at the lower points (1 or 2 especially) they would represent normal size infantry battalions let alone small brigades. 

On the Union side fully 75 % of casualties will be recovered as they both won and retained the battlefield. 3 of 4 lost infantry strength points will recover. On that basis the counter can remain the same but there will be a single  5-5 consolidated base under Sigel for now representing the 1st US infantry, some companies of the US 2nd infantry  and the 1 st, 3d and 5th Missouri infantry.  I modelled the I3 division counter as a two on tabletop 3-5 brigades initially rather than a single full strength 6-5 "Death Star" stand. With 5 tabletop strength points remaining but only 2.5 map points it does not feel right to model as a division with two stands with 2 (a linear stand ?) and 3 points respectively. A 5 strength stand now seems correct which is a brigade of 2,500 men. 

Totten's artillery counter is retained and had no losses. As a makeweight to the infantry situation I will recover 1 of 2 lost union cavalry strength points only rather than "rounding up" and retain a C1 counter but on the tabletop it will be a much reduced  brigade which can operate as a skirmish cavalry stand only. and dismounted as a skirmish sized infantry base.  So Sturgis' brigade is now 1-5 (s) as a tabletop stand representing somewhere around 500 troopers. 

Promotions

The general rule for the battlefield is that 3 victorious divisions for the victor should receive a promotion and 1 for the loser. I think I will model something a little more granular going foward for smaller battles. 

Price' Green division could be promoted to Veteran under normal rules to promote a single losing division but as the infantry are militia they cannot progress beyond "green" under my current home brew of the promotion rules. They will not receive a morale upgrade to 5. The is one of my key concepts for the Boardgame and Volley and Bayonet arena of the campaign. I have to retain an incentive to develop militia counters into properly trained infantry going forward. Under my system Militia counters always retain their PT status even after 6 months. I do not consider that without a charge or being charged with a melee during the battle that they should lose the "No Elite" status either (I could remove that as a discretion for some militia if they perform stunningly well but it is better not to). As a compromise I will however "drag" experience with any Militia unit into any augmentation as an infantry counter to represent the experienced core of the unit.  

As Lyon's command was already veteran it can choose a stand to promote to "Crack". Its morale will increase to 6 and the exhaustion level for the whole counter will be set at 60 %. So Sigel's Missouri brigade will be 5-6. This seems a little strange but the rating of the majority unit would be used (Sigel) when the two infantry stands consolidate. A 2 strength point linear stand is not really allowed if avoidable so Andrews brigade must consolidate. We are not switching units between counters so the integrity of the "division" is not being upset.  This seems fair - the Union persisted with a victory after a couple of rounds whilst losing their overall commander and becoming exhausted. To get from Veteran to Elite for a stand in a division this is the test. They persevered to victory. Essentially the counter on the map is a 2.5 strong brigade which models as a 6-5 crack unit on the battlefield. Any augmentation of the counter can add new brigades so that the division will operate as a "mixed" experience/morale  unit but with a 6 "crack" or "shock" brigade. The overall exhaustion level for the division should however be 60 % unless that becomes a nonsense in which case I can model the division's exhaustion on a more granular level if it gets too big. 

I don't think the battle is large enough to contribute to victory points. 

All that remains is for me to update the tracker for the two commands position and any known components. I will then move to phase 2 of Turn 7 1861 with the initiative chit draw. 

Conclusions

I am sure that I made some mistakes around the effect of Lyon being killed and the effect on the Division of permanently being out of command. I love the rules and the way that the attrition of casualties feeds through to the concept of exhaustion. Rather than simply removing a whole division at once from the battlefield an even fight between divisions then becomes balanced on knife edge. I am also really happy that the post battlefield promotion process will reward a unit in a division which  has suffered that baptism of fire. 

The elite "Black Hats" who fought in the Eastern theatre for much of the war were made up I believe of regiments from Iowa and Wisconsin. Now that the Union has a "crack" brigade which includes elements of regular army battalions and various Missouri regiments I will order and paint up a brigade with regular  "Black Hats" from Pendraken to celebrate their battlefield promotion on the field of Rolla. This is the stuff of notoriety and battlefield legend that I was hoping for when I opted to go in at the deep end with a campaign.

The decision or limitation on the part of the the union to send in a smaller force comprising of just a regular infantry division and an attached regular cavalry brigade gave the union a stiffer line. While the confederates outnumbered the Union 3:2 on the battlefield rolling against a base morale point of 4 rather than 5 made their elements twice as likely to disorder. This led to less effective fire. Both sides reached their exhaustion threshold in the same turn but luckily the Union had become stationary prior to this and inflicted a large number of casualties in a single turn leading to a collapse in morale throughout the small confederate force. For a simple system it delivered a lot of nuance - I found myself wishing for fresh confederate troops to throw into the fight.

The newly built and painted red Rolla courthouse will as in real life now be used as a Union hospital and supply station to support this new staging post for the union forces in Missouri. Do the confederates regroup and hit them back ? Or will the Union consolidate its forces in Missouri and press on to seek a final and early large battle in the Trans-Mississippi such as a "Pea Ridge". I love the way that a campaign begins in effect to tell a story.


Thursday, 31 August 2023

Week 1 July 1861 - "You are all Green Alike" - Lyons and Price lock horns in Missouri


Above : Abraham Lincoln (see site footer) 

"You are green, it is true, but they are green, also; you are all green alike" 

Abraham Lincoln to Irvin McDowell July 1861.

The first step is to draw initiative chits for each side for the turn. Each side will have a guaranteed number of force moves (which might include a leaders command) and then is able to roll against an individual leader's "initiative" to determine whether additional forces can move. A division or other counter not directly controlled by a leader counter will need to use one of the chit moves in order to get about. Naval movement does not require initiative and Naval transports (River or Blue Water) can transport up to ten strength points for 40 hexes on the rivers and 50 hexes at sea. 

From 7/61 to 6/62 the initiative chit pool each turn is very small - 0,1, (2) & 3. It does increase through the war but fluctuates during e.g. Winter.  There is an option for the confederates to always take the number in parenthesis rather than risk a blind pick. I think I will adopt that rule which models a somewhat sclerotic Union strategic command. If the confederates take "2" at the start of a phase they will usually (2/3 of the time) move first with the union having 1 guaranteed initiation or none at all. Rarely (1/3 of the time) the union will move first with 3 guaranteed chit force moves - representing finally say McDowell or Burnside deciding to succumb to pressure and get on with it. The initiative then of individual leader counters then becomes very important. Planning and the resources for it are very finite. It took the Union four years to conquer in effect an area the size of Western Europe and eventually required 2.2 million men at arms  to be called up or volunteer for the Union over that period. 

Confederate Initial Strategy 

I do not think at this stage that the confederates have sufficient strength to attempt to "invade" the North. While Kentucky is a strategic prize for the confederacy the price of breaching Kentucky neutrality is probably too high. The Union would receive fully three times as many Personnel points from the State population as the confederacy in that instance. In some ways Kentucky can act as a "buffer" and the Union  faces the same jeopardy of gifting the confederacy a large amount of additional Personnel points. 

It might be useful for the confederates to bring any straggling units into supply as best they can and to look to shore up the defences of the Mississippi in particular and other "borders" and seaports.  New Orleans needs more than its small garrison to defend itself. In addition some forward deployment of units to Union City in Tennessee might be useful. Historically the confederates entered  Kentucky expecting the local population to rise up which it failed to do in any large numbers. I will leave well alone for now and let the Union make the mistake of disaffecting the Kentucky legislature. Missouri though and St. Louis remain a tempting target. 

In many ways the confederates can adopt a strategy of seeking to hold what they have and perhaps to "dig in" in as many places as are possible for the longer term defence of the new nation. Things are not going to unfold with any great pace even with 2 guaranteed force initiations a week across the 4 turn cycle of the month. Are we heading inexorably to a repeat of first Manasasses (with all the painting that requires !). 

Union Initial Strategy and Logistics 

The victory/political point clock (see my description here) begins ticking for the Union which has a year to capture 4 key confederate cities East of the Mississippi failing which the Confederates will begin to accumulate political points which could allow recognition or even an outright victory. A continuous assault will need to be maintained on Richmond tying down large numbers of troops of the Confederacy in the Virginia theatre. Rather than maintain a single point of pressure it might be useful to attack both frontally on Richmond as well as down the Peninsular from Fort Monroe and possibly even through the mountains of West Virginia flanking Richmond and the confederacy. McLennan is based in Cincinnati and his leader counter is currently the best on the board in terms of his Command Span and Combat Ranking for morale on the tabletop. He is stymied with a low initiative of 1 so nothing is going to move very fast much to Lincoln's dismay unless the priority chit moves are used - on that basis maintaining McDowell in command in the Virginia theatre is acceptable. 

The "target" cities (of which 4 are needed by 8/63 include cities on the Mississipi such as Memphis and Vicksburg as well as strategic cities along the Cumberland and Tennessee rivers such as Nashville, Chattanooga and Knoxville. Further in that valley area in Tennessee there is the strategic railroad from Lynchburg to Cleveland Tennessee. It may be difficult to supply such an army operating in the interior of the Confederacy without developed logistics. 


Supply is traced through operative and owned railroads navicable rivers and coastal hexes from Departments. Supply Depots and train can also dispense supply to nearby units - so in effect operating as forward operating bases for campaigning armies. Movement in the interior will require careful thought. I have read up the rules on railnets, rail cuts and also the broadcast of supply using neutral railroads in Missouri and Kentucky which should help the both sides to a degree.   

Lyons is sat in Missouri with Price 100 miles to the South West in Rolla. Lyons currently has the forces to take on Price and actually with an initiative 

Finally there is the temptation (as the Union did) to secure base of operations on the Confederate coastline. A seaborne campaign for example against targets such as New Orleans or Charleston. 

What is clear is that across 4 turns of July the Union may only receive perhaps 3-5 chit moves in total as an average and probably very spread out (3 or 1 being the only two possible draws or value). It is probably best to focus on developing one strand of strategy through July. 

So is it to be "On to Richmond" to begin applying pressure to the Union from the outset or a subtler more nuanced approach ? What is clear is the strategy that won eventually was one that required extended logistics and multiple axise of attack. Ultimately seizing Richmond would be a huge blow but it is unlikely to be possible on the tabletop for quite some time. I think the political pressure from Abraham Lincoln would be impossible to ignore. I think I have a crash painting exercise to undertake if 60,000 men are to clash in Northern Virginia in July. Nothing will move them if the Union fails in its chit draw and the McDowell fails his initiative roll ! 

Chit Draw - 7/61

Confederate elect to take 2 - 2 forces may automatically have initiative and after that unused leaders may roll. Automatic moves must occur before initiative rolls are determined.

Union draws 0 - no automatic force initiative. 

Confederates to move first 

Confederate Moves 


(1) Confederate M2 counter on 1609 moves to join second militia counter on 1612 just below 1611 Franklin West Virginia.


(2) Initiate Force with Polk***(2-1) at B2802 Memphis 

A *** General without a headquarters can command two divisional counters under the optional historical leaders rules. Those units do not have to move in concert but can disperse. The initiative allows separate orders. 

3021 New Madrid is of no strategic importance to the Confederates other than its position on the Mississippi. Union City at the far NorthWest of Tennesee is also on the Mississippi but  commands a four way rail junction bordering on Kentucky and sits astride the road to Memphis. 3013 next door is also a prime candidate for a fortress as it sits on some bluffs overlooking the river. Historically there were a number of defensive works at this position on the Mississippi including the famous Island Number 10. The M2 counter on New Madrid cannot move to Union City using the Ferry Crossing to Columbus as this would violate Kentucky neutrality - a subject discussed at length earlier in this post and prior posts. It seems difficult to make a river crossing within the movement allowance. 


Thankfully the River Transport unit at Memphis can just about operate to move the I3 unit to Union City. The RT has to pay 10 to embark and disembark troops from its allowance and the distance in water hexsides from the Ferry at Memphis is 20 (total 40). For the I3 unit at Memphis embarking at a Ferry costs 1 movement point and disembarking at a clear hex (Union City is not a "port or base") costs 2 points. There is a separate embarkation and disembarkation points cost table that I have missed before when playing. 

Polk himself can move to Union City by Road or Rail but will accompany his C2 cavalry at a cost of 2 rail points for the cavalry from the Confederates award of 10 for the turn. Leaving now I3, C2 and Polk at Union City. 


Price at Rolla in Missouri fails an initiative roll which could prove costly. There is no need for Magruder commanding an I4 unit on the peninsula to move. He is man-marking Butler at Fort Monroe. Butler has an initiative of "0" and the union has scored "0" this turn on chit moves. He is therefore moribund and cannot advance up the peninsular as he has no motivation or orders !  This information would be available in a two player game. To my mind the porous state of information on a board without fog of war and clarity of ones own divided intentions when playing solo models the state of clear information and gossip about troop movements for much of the war. At the outset of the war the papers in Washington clearly broadcast the intention of the army to a frontal assault on Richmond. 


There is a possibility of concentrating all or part of Joe Johnstons force now with the main force of Beauregard at Manassas junction. Any Union force advancing to Richmond would have to deal with a consolidated land army of more like 30,000 than 20,000 men. Joe Johnston rolls 6 and fails his initiative this turn in any event. 

This concludes the Confederate moves and the Rail Points are reduced by 2 for the cavalry rail movement from Memphis to Union City. 

Union Moves 

The Union is restricted to initiative moves only by leaders. 

McDowel (2), McLennan(1)  and Butler (0) fail initiative tests - automatically in Butler's case ! Heintzelman (2) who was newly placed in Evansville, Illinois  also fails a test. 

I wanted to bring Heintzelman to Missouri to give greater options for a campaign in that small theatre against Price. There for example an I3  counter out on a limb at Jefferson City that could outflank Price's forces while a main assault take place from ... 

Lyons**(4-2)  - the martyr of Wilson's Creek on August 10th 1861. Lyons passes his initiative and can command a division and a brigade as a ** leader. It is time to take the fight to Price. The regular 2nd US army regiment (I3 - 6-5 and not PT NE) moves out together with the US regular cavalry (C1 - Cav 2-5). The Missouri railroads can be used by either side while Missouri is neutral. The union uses 4 rail points to move Lyons' regular forces which detrain in Missouri farmland outside of Rolla at A2114

A further initiative throw will be required to initiate combat. A "4" again on a D6 - Lyons is able to attack Price at Rolla. By luck or judgement I have a small opening battle between Lyons and Price which I can get on the table relatively easily. 


The two Orders of Battle will be as follows :-

Union - Lyons Command - Exhaustion 5 

Lyons - Divisional Commander - "2" Combat rating (I will remind myself how to deal with this on the tabletop but Lyons should get some sort of advantage over Price for morale purposes). 

2nd US Infantry M5 [ ] [ ] [ ] [ ] [ ] [ ] 

US Cavalry Brigade M5 [S] [S] (Treat as Light Cavalry rule 23.1.1 V&B RtGlory - Breach loading carbines) 

Artillery Brigade - SB-F PT  M5 [ ] [ ] 

Confederate - Price Command - Exhaustion 5 

Price - Divisional Commander - "1" Combat Rating 

Militia Regiments (1) M4 PT NE [ ] [ ] [ ] [ ] 

Militia Regiments (2) M4 PT NE [ ] [ ] [ ] [ ] 

Confederate Militia Cavalry Regiments  (1) M5 PT [S] [S] (Treat both brigades as Light Cavalry 23.1.1 V&B RtGlory - Muzzle loading carbines)

Confederate Militia Cavalry Regiments  (2) M 5 PT [S] [S] 

Artillery Brigade SB-F M5 [ ] [ ] 

This is fantastic small painting and terrain project to complete to kick off the campaign on the tabletop. I have the option to double up the scale using the Volley and Bayonet telescoping system so that e.g Price's command becomes perhaps 8 regimental bases. I may however keep it simple and just play the battle on a small 4 x 4 table with the Confederates drawn up in and around Jefferson and the Union forces seeking to eject them from the town. I can also have some fun naming individual militia regiments and minor commanders on the field. 

I am wondering whether I should have perceived the threat and withdrawn the confederates back to Jefferson City but Ultimately that would have not been like Price who has already hatched a plan to steal the Missouri militia artillery and to rouse the local militia. Price could not move however due to his low initiative and the confederates had strategic priorities elsewhere. Lyons has demonstrated as he did in August 1861 that he is on the front foot. I will play out this battle over the next week. 

There is one more rule point I should cover as transfer from the counters to the tabletop. I am not going to treat Militia counters in the boardgame with all of the Militia rules for the tabletop from Volleys & Bayonet. Militia in Volley and Bayonet suffer a permanent disorder from the beginning and as such will rout as soon as they receive a second disorder marker. I have looked through all of the scenarios I could find online for ACW Volley and Bayonet and the Volley and Bayonet House Divided campaign. It doesn't seem that that scenario writers are hampering early war units to this degree. I have opted that any militia counter will retain its "PT" status and will not lose it after 6 months. Further a militia unit will always stay green with a morale of 4 and will not be able to train or be promoted  as a result of battlefield experience to become veteran with a morale of 5. I am using a quarterly system for promotion of units and upgrades for division taken from the excellent Volley and Bayonet ACW campaign designed to be used with the House  Divided board game as its engine. 

Time for the assault on "lead mountain". 

See you in hell Johnny Reb ! See you in hell Billy Yank ! 


Tuesday, 29 August 2023

July (7) 1861 Strategic Cycle - The Gamble for Kentucky and Missouri


Above : Civil War Wagons (see site footer) 

"And having thus chosen our course, without guile, and with pure purpose, let us renew our trust in God, and go forward without fear, and with manly hearts" 

Abraham Lincoln 4 July 1861 in a message to Congress

I am finally now starting the game and simultaneously painting like fury - if the guy from Warbases from Scotland ever reads this blog he will understand where all of his mdf has disapeared to. 

Housekeeping 

I was trying to think how I wanted to update the Blog as I did each strategic turn and move. I would like to preserve the starting Order of battle as a "post" and keep that for prosperity (in case I want to start again after some horrendous error or a lightning victory by one side or the other). I will create a summary of the main actions by either side as posts for each strategic cycle and turn. I will then create a "living position" and keep that at the top of the page. 

So I will enjoy the tracking and book keeping as it will frame the story. In particular I am really looking forward to promoting the component Volley and Bayonet bases contained within the counters on the map and adding some chrome to the armies both through training, new equipments time in the field and battlefield results. There is a good system for this in the House Divided Volley and Bayonet captain which has gone through several iterations and been developed by the Volley and Bayonet community. 

Legends then can be born on the tabletop and noted up. I love Shelby Foote's description in the PBS Ken Burns Civil War documentary of Jackson's appreciation that a battlefield reputation could grow and roll. You are allowed in Volley and Bayonet rules to apply battlefield promotions and confer shock status on chosen brigades. That can then leak back into my painting of bases and choice of flags and so on. I will try  and home-brew a "Battle Honours" system.   

I received  a hefty package of Pendraken figures yesterday including Zoaves for both sides and mounted and dismounted cavalry. I also received a bunch of artillery models and I will be able to track the upgrade of artillery to include rifled and heavier pieces and units. As I go along I will try to name divisions if not brigades where I can identify these.  Much to look forward to. 

Strategic Cycle July 1861

I have "talked" enough but it is how I settle out ideas and find how they work. I "test" things out loud. I will not be shy of stating that something isn't working and change a rule. I want to tell a story or relive some pieces of one in part - I cannot be in competition with myself. My aims are to model something impressive on the tabletop, enjoy the rich and compelling military, economic and political campaign on the map and to share all of that online so that I have a record. My aim is also to finish or at least get a decent ways into this and then have a pause or break for another smaller project. 

I guess we can now start !

July 1861 is a little less complex as a strategic turn. While I will generate new supply points I will  not need to "test" for supply chains and feed armies in the field. Units will have a full four game turns for July to get themselves into supply or arrange for it to come to them. The General Order of a Strategic Turn is 

A Siege Phase on the map (none occurring this turn)

B Production Phase

C Supply and Consumption Phase (not this turn by exception); and

D Political Phase (there is a possibility of the Confederacy making a roll this turn with a 1 or 2 causing   Missouri or Kentucky respectively to secede -  this is very interesting - see below)

B Production Phase July 1861 

(1) Supply Point Generation Segment 

Union begins with 350 points and receives a further 150 points for the July game cycles. The total then is 500 points. The Union receives 100 Personnel points for 7/61 Initial Call. 

Confederates begin with 200 SP and receive supply as follows - Richmond 10,  Nashville 10, Memphis 5, Atlanta 5, New Orleans 10. Confederate cities are valued at 0 this turn but unblocked ports receive 1 point. There are 15 confederate ports (New Orleans also receives a port import supply) but Pensacola and Norfolk are blockaded as described in the summary by Forts Pickens and Fort Monroe respectively. The total then is 253 SP. The Confederates receive 80 Personnel Points for the 7/61 Initial Call. 

(2) New Unit Initiation Segment 

There are two ways to produce new units. Either side can simply create Infanty, Cavalry, Militia units etc. by paying the necessary costs in full in both supply and personnel points. A second option is to convert existing militia or garrison points into cavalry or infantry brigades by removing relevant counters on an unbesieged department and replacing on the production spiral with a counter of the appropriate value. This is a cheaper way to create regular units in terms of personnel points.

Union 

Conversion

For the Union it costs no personnel points and 2 supply points to convert militia to regular infantry division/brigade counters. The relevant costs are 1 and 1 for garrison points. The counters appear after 4 cycles on the production spiral. 

A5309 Cincinatti DepOhio remove M2 place I2 Production spiral 11/61 cost 4 SP

A2712 St Louis DepMissouri remove 2 x M4 place 2 x I4 spiral 11/61 cost 8 SP

C2806 Baltimore DepMiddle remove M4 place I4 spiral 11/61 cost 4 SP 

Purchase 

5 x C1 - cost 30 PP & 25 SP Spiral 12/61

Eleven Garrison Points - cost 11 PP & 11 SP spiral 9/61

5 x M2 - Cost 20 PP & 10 SP spiral 8/61

I4 and I3 - Cost 21 PP & 21 SP spiral 11/61


Confederate 

Conversion 

For the Confederates it costs no personnel points and 1 supply point and to create infantry from militia and 1 and 1 for garrison point. The counters appear after 4 cycles on the production spiral. 

B1705 Little Rock remove 2 x M3 place 2 x I3 spiral 11/61 cost 6 SP 

C2516 Richmond remove 2 x M4 place 2 x I4 Spiral 11/61 cost 8 SP 

Purchase 

5 x M2 - Cost 10 PP & 10 SP spiral 8/61 

2 x G2, 2 x G3   - Cost 10 PP & 20 SP spiral 10/61

2 x RF - Cost 4 PP & 40 SP 

2 x C1 - Cost 6 PP & 8 SP 

4 x I3 - Cost 36 PP & 24 SP 


(3) Existing Unit Augmentation Segment 

Each side can remove an existing infantry or cavalry unit (one per department - not besieged) and replace it on the unit spiral with the additional points. This represents an organisation returning from the field to recruit and expand and is the cheapest way to add strength to an existing counter in terms of Personnel Points. I have decided that I will allow existing bases within a counter that have lost PT status to "top up" strength points without having to achieve  PT status again or to suspend any current "clock" on that status if its still exists. PT status then is lost for time spent on the map. Where a counter expands such that additional bases are required to accommodate the new recruits then a fresh clock should start. I will need then a further number  against every base on my roster within each counter which will be (1-5) after the PT status to track that clock. On "6" PT status is lost. The No Elite "NE" status goes with the conferring of Veteran status in accordance with the House Divided rules. 

Union

I am conscious that I do not want to remove key Union brigades/divisions from the map until some matters are settled (e.g. not withdrawing regular counters in the West). 

Cost infantry - 1 personnel point, 3 supply points, 4 time cycles 

C3401 Philadelphia DepEast remove I1 - I10 to 11/61 production spiral - 9 PP & 27 SP 

C2806 Baltimore DepMiddle remove I1 - I10 to 11/61 production spiral - 9 PP & 27 SP 

Cost cavalry - 4 personnel point, 5 supply points, 5 time cycles 

Confederate 

Cost infantry - 1 personnel point,  2 supply points, 4 time cycles

B2802 Memphis DepKen/Tenn remove I3 - I10 to 11/61 production spiral - 7 PP & 14 SP

C2024 Raleigh DepSVirginia/NCarol remove I3 - I0 to 111/61 production spiral 7 PP & 14 SP 

Cost cavalry - 1 personnel point 4 supply points, 2 time cycles 

(4) Produced Unit Deployment Segment 

Union 

Total 10 Militia points - 2 x M2 Baltimore, and M2 on each of St. Louis, Cincinnati and Philadelphia 

Confederate Total 10 Militia Points. M2 on Little Rock, Raleigh, Charleston, Richmond and Memphis 

(5) Brigade Merge Segment 

Both sides can merge existing brigades (one or two point infantry units or 1 point cavalry units) with division counters (I3 + or C2 +) located in the same hex. I think the brigade bases in this instance can simply sit separately with its  existing PT status as a base or join and appropriate base of the same PT status. If this is not possible I will try and achieve a sensible result with the PT status being diluted on average in terms of its ageing or by some other appropriate averaging mechanic. 

Confederate 

C2108 Winchester - 2 x I2 merge with 2 x I3 to make 2 x I5

C2409 Manassas Junction I4 and 2 I3 merge with 3 x I2 to make, I6 and 2 x I5

(6) Fort Production and Deployment Segment 

It is difficult to plan the unit builds and leave enough for any crucial fortifications which are expensive so I will be spending in this section first and then heading back to items (2) and (3) in each strategic turn. There are some spends that are programmed in  for Washington for the Union and Richmond and Vicksburg for the confederates (the latter commencing next turn). The question for both sides is if they begin fortifications elsewhere. 

As the Union player I might be concerned that the Confederate player can earn political capital through the seizure of key border cities other than Washington. Cincinnati and Baltimore appear remote and secure at this stage stage but St Louis is accessible via the Mississippi. It feels like an abundance of caution however Missouri has been in turmoil for some time and Price the former state governor is lurking in Rolla having seized the state artillery and roused the Missouri militia. You can view my post on this deployment here and my description of Lyons command at St. Louis and the historic dust up at Wilson's Creek with Price on 10 August 1861 here which gave both sides a bloody nose but failed to finally decide the issue of Missouri. Neither side was able to defeat the other and Lyons died in the chaotic fighting. 

There is also the potential for other Union cities to be occupied from 1/62 and connected by road or rail at the political expense of a point a turn. Prior to the decision on whether Kentucky will come out for the Union or not I cannot see any further Union cities immediately under any form of threat e.g. Pittsburg or Baltimore. 

As the Confederates as a priority clearly an amount of resources should be applied to fortifications that will (a) protect major supply cities and (b) secure the Mississippi and deny free passage to the Union and the political capital that relates to that. The Confederates also need to make sure however that they do not waste their 80 personnel points this turn - these must all be spent before any further fortifications are built as these will be lost 

Union

Pays 30 SP for fortification program (see Start Summary) on 2608 Washington - X2 placed (24 " of Field Works).

Pays 40 SP for a X2 fort at St.Louis- X2 placed (24 " of Field Works 2-5 SB-SG  - further instalment of works will appear on October 1861) 

Confederate 

Pays 30 SP for fortification program (see Start Summary on 2516 Richmond) - X2 placed (24" of Field Works) 

(7) Department Deployment Segment 

Union

A3915 Evansville DepCumberland placed on map. 

(8) Headquarters Deployment Segment 

Union 

Needs to Roll 1 on a D6 to place 1 x Army HQ counter - rolls 5 so no placement in 7/61

Confederate 

Needs to roll 1 on D6 to place 1 x Army HQ counter - rolls 5 so no placement in 7/61 

(9) New Historical Leaders

Union 

Heintzleman**(2-1) (promotes to *** on 3/62) is placed on A3915 Evansville 


Confederate 

No new leaders on the schedule for 7/61

(10) Confederate Replacement Segment 

Does not operate until 1862 but is a useful mechanic when it comes. Historically the North would just bleed a battalion or regiment until it was next to non-existent and then merge it with another unit or disband it altogether. Replacements were created as whole new fresh battalions a thousand strong. I guess with a complex system of mobilisation whole battalions could enlist and then retire at the same time when their "papers" expired. Equally a new battalion or regiment could be gathered in-State and drill before marching or being railed to the front. The confederates were much more careful with their regiments and cadres. Fresh troops would be combined as companies or single bunches into existing battalions or regiments. Men would have then the advantage of leadership from a backbone of veterans within a battlefield unit they joined. Further the Union from the outset at Winfield Scott's insistence would keep its regular forces entirely separate from newly raised militia units. In this way a new Union recruit sank or swam without the benefit of leadership from regular non-commissioned or junior officers. Not so the confederacy who parcelled out the veterans and officers to ensure that experienced men leavened their units throughout the war. By insisting on not diluting the professionalism of the 10,000 or so US regulars who joined the 100,000 new volunteers for the Union cause at the start of the war the Union missed a complete trick. 

That's a little digression as well but in this mechanic the Confederates will be able to augment regular infantry unit with one or two garrison points which are initially cheap to raise. Brigades should be able to maintain their battlefield integrity somewhat. 

(11) Militia Demobilisation 

This does not apply for the July 1861 turn for either side but where it does each side rolls a  D6  and on a result of 1 or 2 the militia points on the map are immediately reduced by 50 %. Looking ahead there is a potential demobilisation for the union side next month but for the confederates not until February 1862. There are far more frequent potential demobilisations for the union throughout the game than the confederates. This should cause however both sides to consider promotion Militia to more regular infantry units. 

If a further incentive is needed I have decided that the in-campaign promotion of all newly recruitment units so that they lose their PT status at 6 months will not occur for Militia who will also be unable to progress beyond morale level "Green" i.e they will not be able to promote to veteran and lose their NE ("No Elite" status) which applies in close combat. Infantry will after 6 months lose their PT status and may also by virtue of the upgrade system (battlefield and training)  progress to Veteran and lose their NE status. 

C Supply and Consumption Phase

Does not take place in the first strategic turn of the campaign. Both sides used up all Personnel Points during the prior Phase which is good as the the rule is "use it or use it". The current Supply Point balance for the Union is 239 and for the confederates 91. Outside of the strategic turns supply points can be needed to initiate combat for certain size forces. We can cross that bridge when we come to it as the rules from the main game do not quite work - There is a concept of battlefield "intensity" which allows for the infliction of greater losses depending on the result on the combat tables. Clearly for large scale battles these will be gamed out using the Volley Bayonet rules on the tabletop. I will need to provide for the expenditure of supply and provide for some kind of detriment where a side is not able to provide that supply. A side could perhaps suffer a detriment in the recovery of losses after a battle or possibly some temporary battlefield handicap such as limited ammunition for artillery units or a strength point handicap for a percentage of units.  Perhaps on a roll of 1 on a D6  at the beginning of a battle a brigade base could suffer low ammunition and lose a strength point for the battle only and possibly then the whole army could suffer a reduction of 10 % on the recovery of losses after the battle. 

D Political Phase July 1861 

The current political score for each side is 0. The only result that could be obtained by either side on the political tables in 1861 is for the confederacy. On a roll of 1 on a D6 Missouri will join the confederacy and on a 2 Kentucky. The political appeal would not cost the confederacy anything to make but a subsequent "appeal" would then cost political points (1 for the second attempt). Given the likelhood that over time the position of the Confederacy will deteriorate I think it is well worth the gamble and appealing on the political tables for either of those secondary results which would be a boost to the cause. There may not be a better chance to secure the secessasion of Kentucky and take the borders of the confederacy all the way North to the Ohio River. 


 Missouri and Kentucky are otherwise neutral at the start of the game and will not provide resource to either side until the take a side. For Missouri this can only occur through a victory/political roll on the tables. For Kentucky the situation is somewhat more complicated reflecting the historic position. If either side violates Kentucky's neutrality it will automatically join the other side. A Violation of neutrality occurs through boots on the ground. Either side can egress through the State using River Transport. 

I am using the updated living rules version of the consequences of the States joining the Union or the Confederacy. In Kentucky much of the Eastern portion of the State was pro-union in any event so even if the State was to vote to secede Troops will be raised for either side but the majority of those going to successful side. A similar situation will occur in Missouri and I will describe the specific rules on cessation or re-accession to the Union if and when it occurs. 

Historically Missouri remained with the Union - arguably at gunpoint to a degree and Kentucky invited the Union to expel confederate troops who invaded and occupied Columbus and Bowling Green early in the war. Despite this after the conclusion of the War Kentucky took on quite a rebel character or sympathy for the failed cause. Because of this it was said that Kentucky was the only State to declare secession after the end of hostilities. 

The confederates kept a star in the flag for both neutral border states and had representatives from the States in government and had a large numbers of volunteer  fighting for them and in particular in the Western theatre. 

Confederate Appeal to to the Political Matrix - July 1861 

1 - Mc

2 - Kc

3-6 No Result 

Die Roll - 3 - No Result. Both Missouri and Kentucky remain neutral. Should either side place troops in either Kentucky each will receive Personnel points in accordance with the split set out in the relevant schedule for 5 or 6 strategic turns (broadly 2/3 to 1/3 in favour of the side that dies not violate neutrality). Missouri will remain neutral pending a further appeal to the matrix. The union would receive a bonus of c.80 Personnel Points from union loyalists in Kentucky if the confederacy violates neutrality and as such it would probably be sensible to wait for the Union to make that mistake at this stage. 

I have now update the full summary of counters and brigade bases to take into the account all of the activity for the 7/61 strategic turn.  The next stage is to do a chit draw for initiative and to carry out the first game turn proper (of 4) for 7/61. Years in the game have 13 sets cycles of 4 turns. 


Tuesday, 18 July 2023

Overall attrition and Union Order of Battle for St Louis and Missouri under Nathanial Lyons - July 1861


Above : Union Parade (see site footer) 

I have probably seen off any potential readership with the level of detail in respect of deliberations around the rules for my campaign thus far. As a simplification I have discussed evolution of a system for using the minor monster board war game "War Between the States 1861-65" to run an American Civil War campaign with individual combats being generated for the tabletop using Volley and Bayonet from each weekly move. I have worked out over the last week the broad strokes for interaction between the game mechanics themselves and the tabletop. The translation in particular of divisional strength counters on the tabletop into the brigade manoeuvre units for the tabletop and the interaction of leader counters and how to account for things like artillery typically not represented in the Board Game but just modelled in. 

This post will deal with a final rules point on attrition and then we can get stuck in to describing some of the forces on the map both in terms of counters on the strategic map and potential tabletop brigades and placing them under command.  I have had to be a little flexible to make it work. 

Attrition of Units 

I can still see a number of potential problems but not enough to delay starting to play with my current draft ruleset. One issue I am wary of is that casualty levels in battles could  be too high or too low between the two systems to balance the production and attrition of force levels. This is crucial for the confederacy who should be troop starved over time but not initially. 

I think mathematically the modelling should work. On the tabletop individual divisions have an exhaustion point dependent on their "mean" experience (Green through to Veteran and Crack) of between 40-60 % Once the total number of strength point casualties have been incurred on the tabletop a division will melt away and be unable to take further part in the action. If this happened on average at a 50 % level for a division and then a decent percentage of casualties were recovered overnight ( perhaps on average 50 % of the actual strength point losses dependent on whether you retain the battlefield) then total battlefield casualties (which could include dead, wounded and injured) could total c. 25 % of a  total division strength for a major encounter. This might seem high but there were other killers in Civil War field armies - disease could account for a full 5-10 % of all the troops over time. You were more likely to die of the measles than of a mini-ball on campaign. Equally desertion was a problem on both sides. The Army of Northern Virginia suffered a loss of 40-50 % of its potential troop numbers from desertion and sheer straggling from exhaustion in its first invasion of Maryland prior to the battle of Antietam in the Autumn of 1862. At those that reached the battlefield were resilient. If the attrition levels appear far too high I will simply increase by a small increment e.g. 10 % the post battle recovery rates. Ultimately this is a game and not a simulation and there or thereabouts is good enough. 

Above : Civil War Hospital 

Opening Forces for the Union 

My Civil War campaign will begin in July 1861.  There is a detailed deployment for the Union's opening positions with counter strength and location. As well placement of counters I will need to keep a separate master roster for each counter of its component battalions and artillery. I have read that for V&B campaign rules divisional artillery can either remain as independent battalions or be embedded within the individual brigades as dedicated guns at a rate of 2 stands being augmented DG for each strength point of Divisional artillery removed.  I will play it by ear but the main point is that an artillery battalion should be provided to each substantial division from the outset and in some circumstances corps artillery where that headquarters component exists as a counter on the map. The V&B campaign rules give a good indication of artillery types dependent on the stage of the war.  

The Union forces and resources then begin the game as follows :-

  • The Union has a supply level of 350 points initially but receives an additional supply amount of 25 points for the cycle 7/61 through to 1/62 in addition to those points provided by Cycle Turn Record Track. 
Forces in St Louis under Lyons 
  • The Union Missouri Depot is located at St. Louis near to the confluence of the Missouri and Mississippi Rivers. 
  • Brigadier General Nathanial Lyons ** (4-2) begins the game at St Louis arriving there in command of the 2nd US infantry Regiment at the outset of the war to ensure that Missouri remained in the Union by force if necessary and in particular to deny the arsenal to the local confederate troops. 

Above : General Lyons 
  • On the map at St Louis is positioned XX 3-3 which we can roster as a Regular Infantry Brigade 6-5 (a higher morale and not PT/Poorly trained NE/No Elites deisgnation to represent battalions of the 2nd US Infantry Regiment/Regular US troops. The confederates will also get some stiffer troops at the outset and one or two early upgrades to create units such as Hood's crack Texans. I have ordered a bonny blue flag in 10 mm. Coming back to US army regulars there were at the outset of the war 16,000 regulars, most of them stationed in the West to deal with frontier issues with the indigenous population of the region. While some officers resigned to join the  confederacy the rank and file Federal US Army mostly just took up the Union cause. Only commissions could be "resigned" as such. I am not aware of how many private soldiers might have absconded to take up the confederate cause. The V&B campaign allows the Union side 12 strength points spread across 3 separate 4 strength point brigades with morale 5. Given the counter mix I will model these as 2 brigades of 6-5 troops - one in the East and one in the West, 
  • The other troop points at St Louis are all Militia (12 points of them) so 12 x Militia 1-2 points. For Militia as with all "green" troops I have decided that these will not automatically lose their PT/NE designation which is usually dropped after 6 months for new infantry brigades (i.e. those raised at the outset as regular infantry). Militia will only lose the PT/NE status once augmented through the Campaign Production process to become regular volunteer regiments. This is a cheaper way to produce masses of volunteer infantry battalions and the delay as the counter is paroled back onto the production spiral to re-emerge in a few months will represent the training in camp. I can decide whether those units should emerge without PT/NE status. That might seem sensible although they would still be "Green" for the purpose of Divisional organisation (i.e.  operate on 40 % exhaustion levels). For now the counters will represent collections of Militia units from across Missouri, Iowa and Kansas. 
  • So this totals a further 12,000 troops. Once Militia counters are "Placed" they retain integrity. The total troop numbers in St Louis were historically around 15,000 troops for the Union at the outset. I will split the points into three Militia 4-2 counters. Should they get caught in battle as Militia troops one counter can produce two brigades 4-4 PT NE and the remaining two counters a further four similar understrength brigades representing collections of volunteer militia regiments. Militia do not attach to Corps headquarters as "divisions" in the strategic game and it is likely that the points will simply get augmented to form regular volunteer infantry divisions in due course. 
  • There is also an X 1-4 cavalry counter which probably represents elements of the 1st US Cavalry which appeared in the theatre shortly before the battle of Wilson's Creek. On the St Louis Corps which is described for the start of the V&B campaign has a small 2-5 cavalry brigade attached as Corps troops. These will operate as Light Cavalry under the rules and dismount as a linear base. With one point they can operate as skirmishers. In any event they begin equipped with rifled carbines which roll 3 dice at a long range of 3 ".
  • Finally as we have the equivalent of around two divisions in troop numbers (15,000) we can assign a 2-5 SB-H PT (heavy smoothbore - probably Napoleon 12 lbs) and 2-5 SB-F PT (Field smoothbore) to the XX 3-3 counter and the remainder of the militia counters respectively. 
  • Further West in Jefferson City at the confluence of the Missouri and Osage Rivers sits an XX 3-3 counter which I will model on the battlefield as a single 6-4 PT NE Brigade for now but without attached divisional artillery unless I took an option to split out the 2-5 SB-F PT attached to the St. Louis based Militia as dedicated guns. I could add a DG to the the XX 3-3 in Jefferson City and a further 3 sets of DG designations to the Militia brigades. Or I could just add a single DG to one of the Militia and retain a divisional 1-5 SB-F PT battery (each strength point breaking down into two DG. 
  • Other resources at St Louis include an RT 40 counter. Unarmed riverine transport which can ferry troops or affect a crossing point acting as a ferry. There is also a mobile supply train counter stocked with 2 on board supply points. The rules for the supply web are faily complex. Essentially supply can be broadcast by rivers and rails lines but as soon as an army strikes away from those arteries even by road they will require local supply with them in order to prevent attrition and to give meaningful combat. I will need to provide a battlefield effect to model being out of supply having regard to the board game rules. 

Above : Wilson's Creek 

Historically Lyons is heading for a run in with the  Missouri State Guard under Sterling Price at the battle of Wilson's Creek on August 10 1861 leading the Union's "Army of the West". Quite a moniker for what was around 5,000 volunteers at that point. The 2nd US Infantry was despatched to the East as it fought at First Bull Run. 

Lyons did not survive the  battle was an early and rare success for the confederates in the West. If he lives beyond the end of the August 1861 turn we are already in the realms of the A-historical and counter factual. "What if Lyons survives ?". He has an initiative of 4 and a combat modifier of + 2 making him a very useful divisional leader both on the map and tabletop. A ** general can lead a division and a separate brigade - so two counters only I believe under the map rules. In this situation I expect that Lyons would command the higher cohesive infantry XX 3-3 counter as well as the cavalry X 1-4 unit. That's useful in the Western theatre in any event. 


The Restoration of the Grand Wargaming Project - Some Life Changes (Skip the First Half Please if you have Strayed Here !)

  It has been a long time since I posted here. Nobody reads this blog which is good so I will self indulge. I like it as a record of a big h...